一、CSS概述
CSS中文简称层叠样式表(英文全称:Cascading Style Sheets),用来控制页面的表现,即使页面更好看的语言。
二、CSS基本语法和页面引用
1. css的定义方法
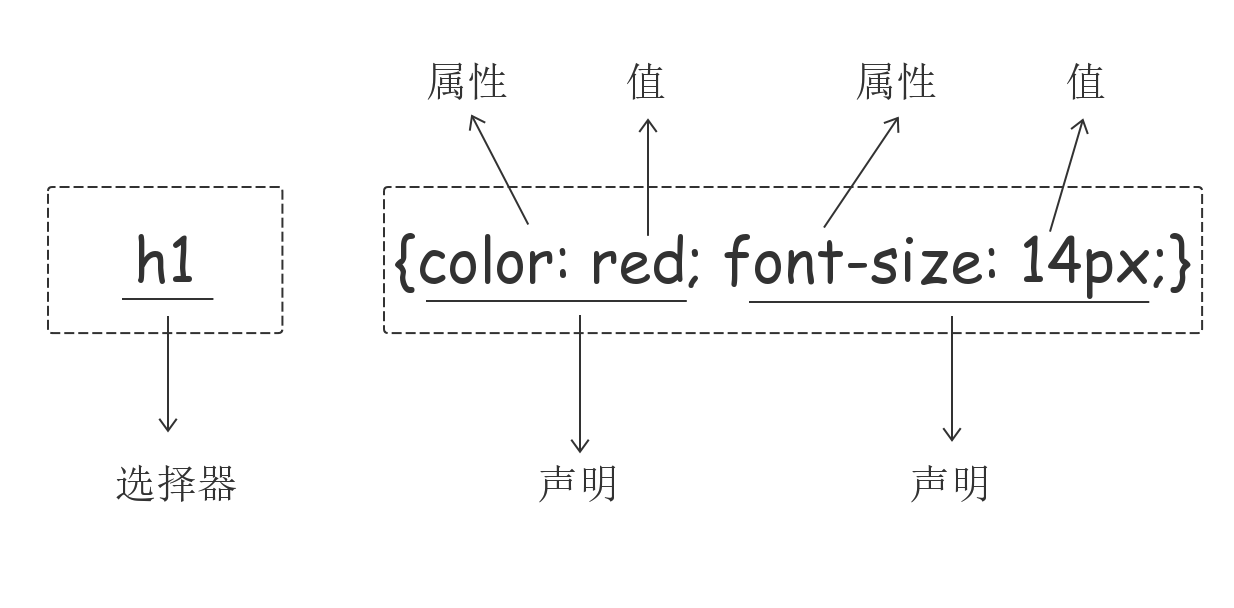
每个CSS样式由两个组成部分:选择器和声明。声明又包括属性和属性值。每个声明之后用分号结束。
1
2
3
4
5
| 选择器 { 属性:值; 属性:值; 属性:值;}
选择器是将样式和页面元素关联起来的名称,属性是希望设置的样式属性每个属性有一个或多个值。代码示例:
div{ width:100px; height:100px; color:red }
|
css通用书写结构
1
2
3
4
5
6
7
8
9
10
11
12
13
14
15
16
17
18
19
20
21
22
23
24
25
26
27
|
p {
color: red;
font-size: 18px
}
h1 {
color: green;
}
#p2 {
color: black;
}
.c1 {
color: yellow;
}
|
2. CSS页面引入方法
1
2
3
4
5
6
7
8
9
10
11
12
13
14
15
| (1)、外联式:通过link标签,链接到外部样式表到页面中。
<link rel="stylesheet" type="text/css" href="css/main.css">
(2)、嵌入式:通过style标签,在网页上创建嵌入的样式表。
<style type="text/css">
div{ width:100px; height:100px; color:red }
......
</style>
(3)、内联式:通过标签的style属性,在标签上直接写样式。
<div style="width:100px; height:100px; color:red ">......</div>
(4)、导入式:引用数量有限制
<style>@import"css/main.css";</style>
实际工作中,我们常用外联式和嵌入式。
|
示例
内联式
1
2
3
4
5
6
7
8
9
10
11
12
13
14
15
16
17
18
19
| <!DOCTYPE html>
<html lang="en">
<head>
<meta charset="UTF-8">
<title>内联式</title>
</head>
<body>
<div>
<h2 style="text-align: center;">什么是CSS</h2>
<p style="color: red;text-indent: 20px; font-size: 16px;">
为了让网页元素的样式更加丰富,也为了让网页的内容和样式能拆分开,CSS由此思想而诞生,CSS是 Cascading Style Sheets 的首字母缩写,意思是层叠样式表。有了CSS,html中大部分表现样式的标签就废弃不用了,html只负责文档的结构和内容,表现形式完全交给CSS,html文档变得更加简洁。
</p>
<hr>
<p style="color: blue;text-indent: 20px;font-size: 16px;">
第一行是文档声明,第二行"html"标签和最后一行“html”定义html文档的整体,“html”标签中的‘lang=“en”’定义网页的语言为英文,定义成中文是'lang="zh-CN"',不定义也没什么影响,它一般作为分析统计用。 “head”标签和“body”标签是它的第一层子元素,“head”标签里面负责对网页进行一些设置以及定义标题,设置包括定义网页的编码格式,外链css样式文件和javascript文件等,设置的内容不会显示在网页上,标题的内容会显示在标题栏,“body”内编写网页上显示的内容。
</p>
</div>
</body>
</html>
|
嵌入式
1
2
3
4
5
6
7
8
9
10
11
12
13
14
15
16
17
18
19
20
21
22
23
24
25
26
27
28
29
30
31
32
33
34
35
36
| <!DOCTYPE html>
<html lang="en">
<head>
<meta charset="UTF-8">
<title>嵌入式</title>
<style>
h2{
text-align: center;
}
#p1{
color: red;
text-indent: 20px;
font-size: 16px;
}
#p2{
color: blue;
text-indent: 20px;
font-size: 16px;
}
</style>
</head>
<body>
<div>
<h2>什么是CSS</h2>
<p id="p1">
为了让网页元素的样式更加丰富,也为了让网页的内容和样式能拆分开,CSS由此思想而诞生,CSS是 Cascading Style Sheets 的首字母缩写,意思是层叠样式表。有了CSS,html中大部分表现样式的标签就废弃不用了,html只负责文档的结构和内容,表现形式完全交给CSS,html文档变得更加简洁。
</p>
<hr>
<p id="p2">
第一行是文档声明,第二行"html"标签和最后一行“html”定义html文档的整体,“html”标签中的‘lang=“en”’定义网页的语言为英文,定义成中文是'lang="zh-CN"',不定义也没什么影响,它一般作为分析统计用。 “head”标签和“body”标签是它的第一层子元素,“head”标签里面负责对网页进行一些设置以及定义标题,设置包括定义网页的编码格式,外链css样式文件和javascript文件等,设置的内容不会显示在网页上,标题的内容会显示在标题栏,“body”内编写网页上显示的内容。
</p>
</div>
</body>
</html>
|
外联式
1
2
3
4
5
6
7
8
9
10
11
12
13
14
15
16
17
18
19
20
| <!DOCTYPE html>
<html lang="en">
<head>
<meta charset="UTF-8">
<title>嵌入式</title>
<link rel="stylesheet" type="text/css" href="css/main.css">
</head>
<body>
<div>
<h2>什么是CSS</h2>
<p id="p1">
为了让网页元素的样式更加丰富,也为了让网页的内容和样式能拆分开,CSS由此思想而诞生,CSS是 Cascading Style Sheets 的首字母缩写,意思是层叠样式表。有了CSS,html中大部分表现样式的标签就废弃不用了,html只负责文档的结构和内容,表现形式完全交给CSS,html文档变得更加简洁。
</p>
<hr>
<p class="cb">
第一行是文档声明,第二行"html"标签和最后一行“html”定义html文档的整体,“html”标签中的‘lang=“en”’定义网页的语言为英文,定义成中文是'lang="zh-CN"',不定义也没什么影响,它一般作为分析统计用。 “head”标签和“body”标签是它的第一层子元素,“head”标签里面负责对网页进行一些设置以及定义标题,设置包括定义网页的编码格式,外链css样式文件和javascript文件等,设置的内容不会显示在网页上,标题的内容会显示在标题栏,“body”内编写网页上显示的内容。
</p>
</div>
</body>
</html>
|
main.css
1
2
3
4
5
6
7
8
9
10
11
12
13
14
15
16
17
18
19
20
21
22
23
24
25
|
h2{
text-align: center;
}
#p1{
color: red;
text-indent: 20px;
font-size: 16px;
}
p{
text-indent: 20px;
font-size: 16px;
}
.cb{
color: blue;
}
|
三、CSS选择器
1. 基础选择器
1
2
3
4
5
6
7
8
9
10
11
12
13
14
15
16
17
18
19
20
21
22
23
24
25
26
27
28
29
30
| (1)*:通用选择器,匹配任何元素。* { margin:0; padding:0; }
标签选择器
(2)标签选择器,此种选择器影响范围大,建议尽量应用在层级选择器中。
举例:
*{margin:0;padding:0}
div{color:red}
<div>....</div>
<div class="box">....</div>
(3)id选择器
通过id名来选择元素,元素的id名称不能重复,所以一个样式设置项只能对应于页面上一个元素,不能复用,id名一般给程序使用,所以不推荐使用id作为选择器。
举例:
#box{color:red}
<div id="box">....</div>
(4)类选择器
通过类名来选择元素,一个类可应用于多个元素,一个元素上也可以使用多个类,应用灵活,可复用,是css中应用最多的一种选择器。
举例:
.red{color:red}
.big{font-size:20px}
.mt10{margin-top:10px}
<div class="red">....</div>
<h1 class="red big mt10">....</h1>
<p class="red mt10">....</p>
|
2. 组合选择器
1
2
3
4
5
6
7
8
9
10
11
12
13
14
15
16
17
18
19
20
21
22
23
24
25
26
27
28
29
30
31
32
33
34
35
36
37
38
39
40
41
| (1)层级选择器(后代选择器)
主要应用在选择父元素下的子元素,或者子元素下面的子元素,可与标签元素结合使用,减少命名,同时也可以通过层级,防止命名冲突。
举例:
.box span{color:red}
.box .red{color:pink}
.red{color:red}
<div class="box">
<span>....</span>
<a href="#" class="red">....</a>
</div>
<h3 class="red">....</h3>
(2)组选择器
多个选择器,如果有同样的样式设置,可以使用组选择器。
举例:
.box1,.box2,.box3{width:100px;height:100px}
.box1{background:red}
.box2{background:pink}
.box2{background:gold}
<div class="box1">....</div>
<div class="box2">....</div>
<div class="box3">....</div>
(3)子元素选择器(儿子选择器)
E>F 子元素选择器,匹配所有E元素的子元素F
div > p { color:#f00; }
(4)毗邻选择器
div+p {
margin: 5px;
}
(5)弟弟选择器
#i1~p {
border: 2px solid royalblue;
}
|
注意嵌套规则:
1
2
3
4
| 块级元素可以包含内联元素或某些块级元素,但内联元素不能包含块级元素,它只能包含其它内联元素。
有几个特殊的块级元素只能包含内联元素,不能包含块级元素。如h1,h2,h3,h4,h5,h6,p,dt
li内可以包含div
块级元素与块级元素并列、内联元素与内联元素并列。。
|
3. 属性选择器
1
2
3
4
5
6
7
8
9
10
11
| E[att] 匹配所有具有att属性的E元素,不考虑它的值。(注意:E在此处可以省略,比如“[cheacked]”。以下同。) p[title] { color:#f00; }
E[att=val] 匹配所有att属性等于“val”的E元素 div[class=”error”] { color:#f00; }
E[att~=val] 匹配所有att属性具有多个空格分隔的值、其中一个值等于“val”的E元素 td[class~=”name”] { color:#f00; }
E[attr^=val] 匹配属性值以指定值开头的每个元素 div[class^="test"]{background:#ffff00;}
E[attr$=val] 匹配属性值以指定值结尾的每个元素 div[class$="test"]{background:#ffff00;}
E[attr*=val] 匹配属性值中包含指定值的每个元素 div[class*="test"]{background:#ffff00;}
|
4. 伪类选择器
伪类选择器是为了给选择器添加一些特殊效果
anchor伪类:专用于控制链接的显示效果
1
2
3
4
5
6
7
8
9
10
11
12
13
14
15
16
17
18
19
| a:link(没有接触过的链接),用于定义了链接的常规状态。
a:hover(鼠标放在链接上的状态),用于产生视觉效果。
a:visited(访问过的链接),用于阅读文章,能清楚的判断已经访问过的链接。
a:active(在链接上按下鼠标时的状态),用于表现鼠标按下时的链接状态。
伪类选择器 : 伪类指的是标签的不同状态:
a ==> 点过状态 没有点过的状态 鼠标悬浮状态 激活状态
a:link {color: #FF0000}
a:visited {color: #00FF00}
a:hover {color: #FF00FF}
a:active {color: #0000FF} 格式: 标签:伪类名称{ css代码; }
|
before,after伪类
1
2
3
4
5
6
7
8
9
| • 常用的伪类选择器有hover,表示鼠标悬浮在元素上时的状态,伪元素选择器有before和after,它们可以通过样式在元素中插入内容。
• .box1:hover{color:red}
• .box2:before{content:'行首文字';}
• .box3:after{content:'行尾文字';}
•
•
• <div class="box1">....</div>
• <div class="box2">....</div>
• <div class="box3">....</div>
|
示例;
04_css_引入示例
1
2
3
4
5
6
7
8
9
10
11
12
13
14
15
16
17
18
19
20
21
22
23
24
25
26
27
| <!DOCTYPE html>
<html lang="zh-CN">
<head>
<meta charset="UTF-8">
<title>CSS引入示例</title>
<link rel="stylesheet" href="css/index.css">
</head>
<body>
<p id="p1">海燕</p>
<p id="p2">这个是个黑色的海燕</p>
<p class="c1">这个是个黑色的海燕</p>
<p class="c1">这个是个黑色的海燕</p>
<p class="c1">这个是个黑色的海燕</p>
<p class="c1">这个是个黑色的海燕</p>
<h1>海燕</h1>
</body>
</html>
04_css_引入示例
|
index.css
1
2
3
4
5
6
7
8
9
10
11
12
13
14
15
16
17
18
19
20
21
22
23
24
25
26
| 解释性的信息
*/
p {
color: red;
font-size: 18px
}
h1 {
color: green;
}
#p2 {
color: black;
}
.c1 {
color: yellow;
}
|
05_css_组合选择器
1
2
3
4
5
6
7
8
9
10
11
12
13
14
15
16
17
18
19
20
21
22
23
24
25
26
27
| <!DOCTYPE html>
<html lang="zh-CN">
<head>
<meta charset="UTF-8">
<title>组合选择器示例</title>
<link rel="stylesheet" href="css/index2.css">
</head>
<body>
<hr>
<p>000</p>
<div>111</div>
<p>222</p>
<p>333</p>
</body>
</html>
|
index2.css
1
2
3
4
5
6
7
8
9
10
11
12
13
14
15
16
17
18
19
20
21
22
|
div~p{
color: blue;
}
|
06_css_属性选择器
1
2
3
4
5
6
7
8
9
10
11
12
13
14
15
| <!DOCTYPE html>
<html lang="zh-CN">
<head>
<meta charset="UTF-8">
<title>属性选择器示例</title>
<link rel="stylesheet" href="css/index3.css">
</head>
<body>
<p nb="hao" >我是一个p标签</p>
<p nb="good">我也是一个p标签</p>
<p>我是还是一个p标签</p>
</body>
</html>
|
index3.css
1
2
3
4
5
6
7
8
9
|
[nb="hao"] {
color: blue;
}
|
07_css_分组和嵌套示例
1
2
3
4
5
6
7
8
9
10
11
12
13
14
15
16
17
18
| <!DOCTYPE html>
<html lang="zh-CN">
<head>
<meta charset="UTF-8">
<title>分组和嵌套示例</title>
<link rel="stylesheet" href="css/index4.css">
<link rel="stylesheet" href=css/index44.css">
</head>
<body>
<div id="d1">我是一个div标签</div>
<p id="p1" style="color: yellow">我是一个p标签</p>
<div id="d2" class="">10个类选择器</div>
</body>
</html>
|
index4.css
1
2
3
4
5
6
7
8
9
10
11
12
13
14
15
16
17
18
19
20
21
22
23
24
25
26
|
#d1,
p {
color: red;
}
div+p {
}
#d1+p {
}
#p1 {
color: deeppink;
}
|
index44.css
1
2
3
4
5
6
7
8
9
10
11
12
|
#d1,
p {
color: green;
}
|
四、CSS优先级
1
2
3
4
5
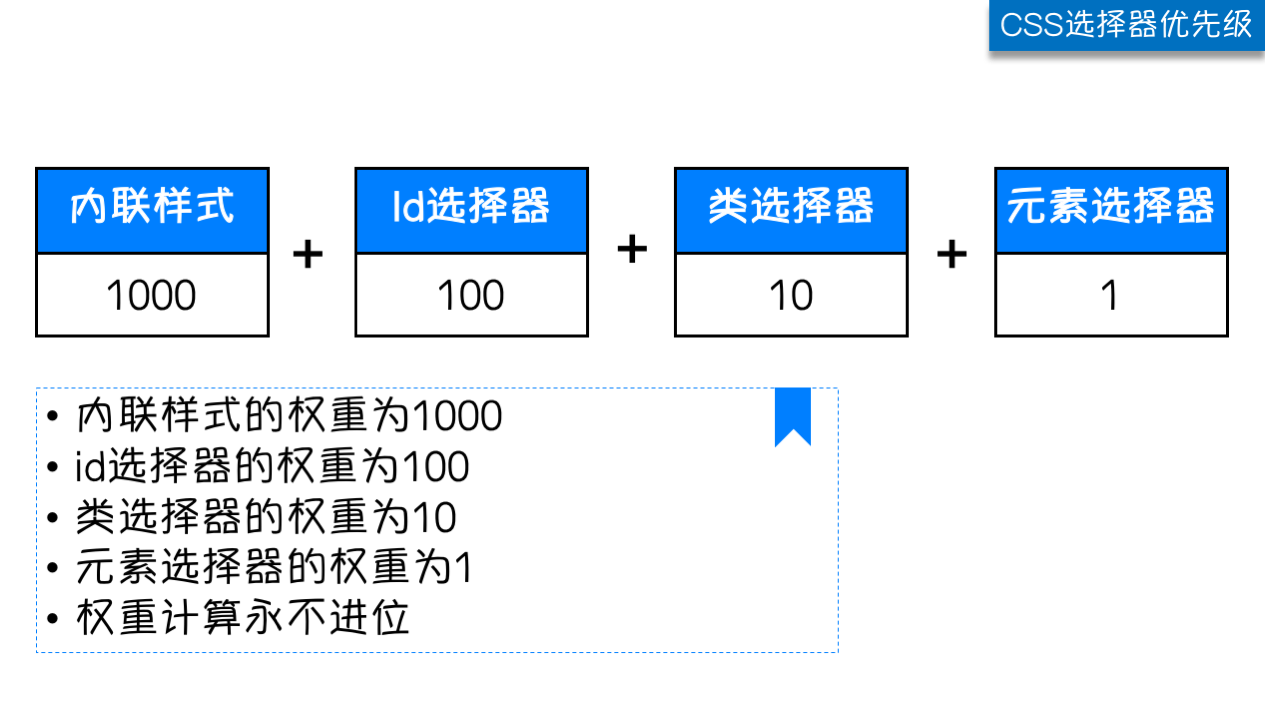
| 样式表中的特殊性描述了不同规则的相对权重,它的基本规则是:
1 内联样式表的权值最高 style=""-------------------1000;
2 统计选择符中的ID属性个数。 #id -------------100
3 统计选择符中的CLASS属性个数。 .class -------------10
4 统计选择符中的HTML标签名个数。 p --------------1
|
按这些规则将数字符串逐位相加,就得到最终的权重,然后在比较取舍时按照从左到右的顺序逐位比较。
注:一票否决权: font-size: 14px !important
五、CSS的继承性
1
2
3
4
5
6
7
8
9
| CSS的继承性:
继承是CSS的一个主要特征,它是依赖于祖先-后代的关系的。继承是一种机制,它允许样式不仅可以应用于某个特定的元素,还可以应用于它的后代。例如一个BODY定义了的颜色值也会应用到段落的文本中。
body{color:red;} <p>helloyuan</p>
这段文字都继承了由body {color:red;}样式定义的颜色。然而CSS继承性的权重是非常低的,是比普通元素的权重还要低的0。
p{color:green}
发现只需要给加个颜色值就能覆盖掉它继承的样式颜色。由此可见:任何显示申明的规则都可以覆盖其继承样式。
此外,继承是CSS重要的一部分,我们甚至不用去考虑它为什么能够这样,但CSS继承也是有限制的。有一些属性不能被继承,如:border, margin, padding, background等。
|
附加说明:
1
2
3
4
5
6
7
8
9
| 1、文内的样式优先级为1,0,0,0,所以始终高于外部定义。这里文内样式指形如<div style="color:red>blah</div>的样式,而外部定义指经由<link>或<style>卷标定义的规则。
2、有!important声明的规则高于一切。
3、如果!important声明冲突,则比较优先权。
4、如果优先权一样,则按照在源码中出现的顺序决定,后来者居上。
5、由继承而得到的样式没有specificity的计算,它低于一切其它规则(比如全局选择符*定义的规则)。
|
六、CSS文本设置
1
2
3
4
5
6
7
8
9
10
11
12
13
| 常用的应用文本的css样式:
• color 设置文字的颜色,如: color:red;
• font-size 设置文字的大小,如:font-size:12px;
• font-family 设置文字的字体,如:font-family:'微软雅黑';
• font-style 设置字体是否倾斜,如:font-style:'normal'; 设置不倾斜,font-style:'italic';设置文字倾斜
• font-weight 设置文字是否加粗,如:font-weight:bold; 设置加粗 font-weight:normal 设置不加粗
• font 同时设置文字的几个属性,写的顺序有兼容问题,建议按照如下顺序写: font:是否加粗 字号/行高 字体;如: font:normal 12px/36px '微软雅黑';
• line-height 设置文字的行高,如:line-height:24px;
• text-decoration 设置文字的下划线,如:text-decoration:none; 将文字下划线去掉
• text-indent 设置文字首行缩进,如:text-indent:24px; 设置文字首行缩进24px
• text-align 设置文字水平对齐方式,如text-align:center 设置文字水平
快捷方式:
(div.box>a)*4
|
css中的font-family
1
2
3
4
5
6
7
8
9
10
11
12
13
14
15
16
17
18
19
20
21
22
23
24
25
26
27
28
29
30
31
32
33
34
35
36
37
38
39
| 华文细黑:STHeiti Light [STXihei]
华文黑体:STHeiti
华文楷体:STKaiti
华文宋体:STSong
华文仿宋:STFangsong
儷黑 Pro:LiHei Pro Medium
儷宋 Pro:LiSong Pro Light
標楷體:BiauKai
蘋果儷中黑:Apple LiGothic Medium
蘋果儷細宋:Apple LiSung Light
Windows的一些:
新細明體:PMingLiU
細明體:MingLiU
標楷體:DFKai-SB
黑体:SimHei
宋体:SimSun
新宋体:NSimSun
仿宋:FangSong
楷体:KaiTi
仿宋_GB2312:FangSong_GB2312
楷体_GB2312:KaiTi_GB2312
微軟正黑體:Microsoft JhengHei
微软雅黑体:Microsoft YaHei
装Office会生出来的一些:
隶书:LiSu
幼圆:YouYuan
华文细黑:STXihei
华文楷体:STKaiti
华文宋体:STSong
华文中宋:STZhongsong
华文仿宋:STFangsong
方正舒体:FZShuTi
方正姚体:FZYaoti
华文彩云:STCaiyun
华文琥珀:STHupo
华文隶书:STLiti
华文行楷:STXingkai
华文新魏:STXinwei
|
注:css颜色表示法
1
2
3
4
| • css颜色值主要有三种表示方法:
• 1、颜色名表示,比如:red 红色,gold 金色
• 2、rgb表示,比如:rgb(255,0,0)表示红色
• 3、16进制数值表示,比如:#ff0000 表示红色,这种可以简写成 #f00
|
参考: http://www.w3school.com.cn/cssref/css_colornames.asp
列表属性
1
2
3
4
| ul,ol{ list-style: decimal-leading-zero;
list-style: none; <br> list-style: circle;
list-style: upper-alpha;
list-style: disc; }
|
例子
文本样式
1
2
3
4
5
6
7
8
9
10
11
12
13
14
15
16
17
18
19
20
21
22
23
24
25
26
27
28
29
30
31
32
33
34
35
36
37
38
39
40
41
42
43
44
45
46
47
48
49
50
51
52
53
54
55
56
57
58
59
60
| <!DOCTYPE html>
<html lang="en">
<head>
<meta charset="UTF-8">
<title>文本样式</title>
<style>
.box{
width: 600px;
height: 800px;
margin: 0 auto;
}
h2{
font-family: '楷体';
font-size: 30px;
color: blue;
font-weight: bold;
font-style: normal;
line-height: 50px;
text-decoration: underline;
}
.author{
color: red;
}
div{
text-align: left;
word-spacing: 10px;
text-transform: capitalize;
}
</style>
</head>
<body>
<div class="box">
<h2>面朝大海,春暖花开</h2>
<span class="author">【作者】海子 【朝代】现代</span>
<div>
<p>
从明天起,做一个幸福的人</br>
喂马,劈柴,周游世界</br>
从明天起,关心粮食和蔬菜</br>
我有一所房子,面朝大海,春暖花开</br>
</p>
<p>
从明天起,和每一个亲人通信</br>
告诉他们我的幸福</br>
那幸福的闪电告诉我的</br>
我将告诉每一个人</br>
</p>
<p>
给每一条河每一座山取一个温暖的名字</br>
陌生人,我也为你祝福</br>
愿你有一个灿烂的前程</br>
愿你有情人终成眷属</br>
愿你在尘世获得幸福</br>
我只愿面朝大海,春暖花开</br>
</p>
</div>
</div>
</body>
</html>
|
七、CSS盒子模型
1. 盒子模型解释
1
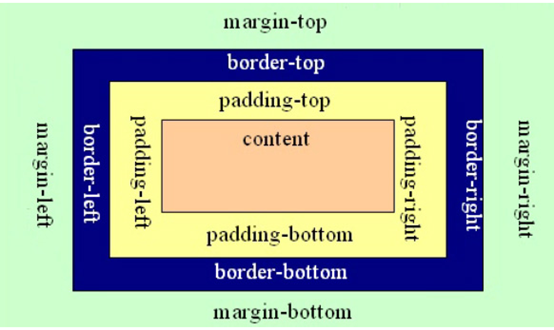
| 元素在页面中显示成一个方块,类似一个盒子,CSS盒子模型就是使用现实中盒子来做比喻,帮助我们设置元素对应的样式。盒子模型示意图如下:
|
1
| 把元素叫做盒子,设置对应的样式分别为:盒子的边框、盒子内的内容和边框之间的间距、盒子与盒子之间的间距。
|
2. 设置边框
1
2
3
4
5
6
7
8
9
10
11
12
13
14
| 设置一边的边框,比如顶部边框,可以按如下设置:
border-top-color:red;
border-top-width:10px;
border-top-style:solid;
上面三句可以简写成一句:
border-top:10px solid red;
设置其它三个边的方法和上面一样,把上面的'top'换成'left'就是设置左边,换成'right'就是设置右边,换成'bottom'就是设置底边。
四个边如果设置一样,可以将四个边的设置合并成一句:
border:10px solid red;
|
3. 设置内间距padding
1
2
3
4
5
6
7
8
9
10
11
12
13
14
15
| 设置盒子四边的内间距,可设置如下:
padding-top:20px;
padding-left:30px;
padding-right:40px;
padding-bottom:50px;
上面的设置可以简写如下:
padding:20px 40px 50px 30px;
padding后面还可以跟3个值,2个值和1个值,它们分别设置的项目如下:
padding:20px 40px 50px;
padding:20px 40px;
padding:20px;
|
4. 设置外间距margin
外边距的设置方法和padding的设置方法相同,将上面设置项中的’padding’换成’margin’就是外边距设置方法。
1
2
3
4
5
6
7
8
9
10
11
12
13
14
15
16
17
18
19
20
21
| <!DOCTYPE html>
<html lang="en">
<head>
<meta charset="UTF-8">
<title>盒子的真实尺寸</title>
<style type="text/css">
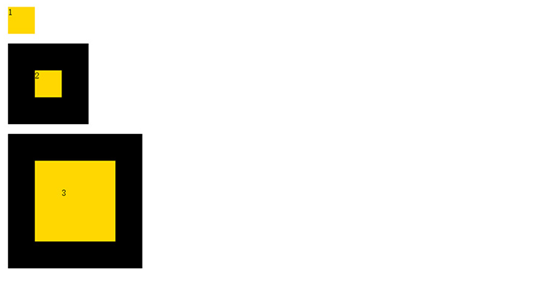
.box01{width:50px;height:50px;background-color:gold;}
.box02{width:50px;height:50px;background-color:gold;border:50px
solid #000}
.box03{width:50px;height:50px;background-color:gold;border:50px
solid #000;padding: 50px;}
</style>
</head>
<body>
<div class="box01">1</div>
<br />
<div class="box02">2</div>
<br />
<div class="box03">3</div>
</body>
</html>
|
5. 外边距合并
1
2
3
4
5
6
7
| 外边距合并
外边距合并指的是,当两个垂直外边距相遇时,它们将形成一个外边距。合并后的外边距的高度等于两个发生合并的外边距的高度中的较大者。解决方法如下:
1、使用这种特性
2、设置一边的外边距,一般设置margin-top
3、将元素浮动或者定位
|
6. margin塌陷
1
2
3
4
5
6
7
8
9
10
11
| 在两个盒子嵌套时候,内部的盒子设置的margin-top会加到外边的盒子上,导致内部的盒子margin-top设置失败.
父级div中没有 border,padding,inline content,子级div的margin会一直向上找,直到找到某个标签包括border,padding,inline content中的其中一个,
然后按此div 进行margin;
解决方法如下:
1、外部盒子设置一个边框或padding或文本内容
2、外部盒子设置 overflow:hidden
3、使用伪元素类:
.clearfix:before{
content: '';
display:table;
}
|
例子
盒子模型
1
2
3
4
5
6
7
8
9
10
11
12
13
14
15
16
17
18
19
20
21
22
23
24
25
26
27
28
29
30
31
32
33
34
35
36
37
38
39
40
41
42
43
44
45
46
47
48
49
50
51
52
53
54
55
56
57
58
59
| <!DOCTYPE html>
<html lang="en">
<head>
<meta charset="UTF-8">
<title>盒子模型</title>
<style>
.box{
width: 200px;
height: 100px;
background-color: yellow;
/*border-top-width: 10px;
border-top-color: #000;
实线:solid 虚线: dashed 点县:dotted
border-top-style:solid; */
/*border-top: 10px solid #000;
border-left: 10px dashed #000;
border-right: 10px dotted #000;
border-bottom: 10px solid #000;*/
border: 50px solid #000;
/*padding-top: 20px;
padding-left: 40px;
padding-right: 100px;
padding-bottom: 200px; */
padding: 100px;
/*margin-top: 50px;
margin-left: 100px;
margin-right: 200px;
margin-bottom: 300px;*/
margin: 50px auto;
/*分别设置上下左右
margin: 100px;*/
}
</style>
</head>
<body>
<div class="box">
元素在页面中显示成一个方块,类似一个盒子,CSS盒子模型就是使用现实中盒子来做比喻,帮助我们设置元素对应的样式。盒子模型示意图如下:
</div>
<div class="box">
元素在页面中显示成一个方块,类似一个盒子,CSS盒子模型就是使用现实中盒子来做比喻,帮助我们设置元素对应的样式。盒子模型示意图如下:
</div>
</body>
</html>
|
导航条
1
2
3
4
5
6
7
8
9
10
11
12
13
14
15
16
17
18
19
20
21
22
23
24
25
26
27
28
29
30
31
32
33
34
35
36
37
38
39
40
41
42
43
44
45
46
47
48
49
50
51
52
53
54
55
56
57
58
59
60
| <!DOCTYPE html>
<html lang="en">
<head>
<meta charset="UTF-8">
<title>文本样式</title>
<style>
.box{
width: 600px;
height: 800px;
margin: 0 auto;
}
h2{
font-family: '楷体';
font-size: 30px;
color: blue;
font-weight: bold;
font-style: normal;
line-height: 50px;
text-decoration: underline;
}
.author{
color: red;
}
div{
text-align: left;
word-spacing: 10px;
text-transform: capitalize;
}
</style>
</head>
<body>
<div class="box">
<h2>面朝大海,春暖花开</h2>
<span class="author">【作者】海子 【朝代】现代</span>
<div>
<p>
从明天起,做一个幸福的人</br>
喂马,劈柴,周游世界</br>
从明天起,关心粮食和蔬菜</br>
我有一所房子,面朝大海,春暖花开</br>
</p>
<p>
从明天起,和每一个亲人通信</br>
告诉他们我的幸福</br>
那幸福的闪电告诉我的</br>
我将告诉每一个人</br>
</p>
<p>
给每一条河每一座山取一个温暖的名字</br>
陌生人,我也为你祝福</br>
愿你有一个灿烂的前程</br>
愿你有情人终成眷属</br>
愿你在尘世获得幸福</br>
我只愿面朝大海,春暖花开</br>
</p>
</div>
</div>
</body>
</html>
|
八、CSS元素溢出
1
2
3
4
5
6
7
| 当子元素的尺寸超过父元素的尺寸时,需要设置父元素显示溢出的子元素的方式,设置的方法是通过overflow属性来设置。
overflow的设置项:
1、visible 默认值。内容不会被修剪,会呈现在元素框之外。
2、hidden 内容会被修剪,并且其余内容是不可见的,此属性还有清除浮动、清除margin-top塌陷的功能。
3、scroll 内容会被修剪,但是浏览器会显示滚动条以便查看其余的内容。
4、auto 如果内容被修剪,则浏览器会显示滚动条以便查看其余的内容。
5、inherit 规定应该从父元素继承 overflow 属性的值。
|
九、background属性
1
2
3
4
5
6
7
8
| 属性解释
background属性是css中应用比较多,且比较重要的一个属性,它是负责给盒子设置背景图片和背景颜色的,background是一个复合属性,它可以分解成如下几个设置项:
• background-color 设置背景颜色
• background-image 设置背景图片地址
• background-repeat 设置背景图片如何重复平铺
• background-position 设置背景图片的位置
• background-attachment 设置背景图片是固定还是随着页面滚动条滚动
实际应用中,我们可以用background属性将上面所有的设置项放在一起,而且也建议这么做,这样做性能更高,而且兼容性更好,比如:“background: #00FF00 url(bgimage.gif) no-repeat left center fixed”,这里面的“#00ff00”是设置background-color;“url(bgimage.gif)”是设置background-image;“no-repeat”是设置background-repeat;“left center”是设置background-position;“fixed”是设置background-attachment,各个设置项用空格隔开,有的设置项不写也是可以的,它会使用默认值。
|
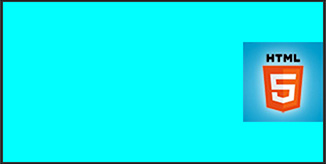
1、“background:url(bg.jpg)”,默认设置一个图片地址,图片会从盒子的左上角开始将盒子铺满。
2、“background:cyan url(bg.jpg) repeat-x”,横向平铺盒子,盒子其他部分显示背景颜色“cyan”。
3、“background:cyan url(bg.jpg) repeat-y”,纵向平铺盒子,盒子其他部分显示背景颜色“cyan”。
4、“background:cyan url(bg.jpg) no-repeat”,背景不重复,背景和盒子左上角对齐,盒子其他部分显示背景颜色“cyan”。
5、“background:cyan url(bg.jpg) no-repeat left center”,背景不重复,背景和盒子左中对齐,盒子其他部分显示背景颜色“cyan”。
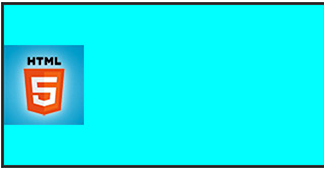
6、“background:cyan url(bg.jpg) no-repeat right center”,背景不重复,背景和盒子右中对齐,也就是背景图片的右边对齐盒子的右边,盒子其他部分显示背景颜色“cyan”。
十、浮动
1
2
3
4
5
6
7
8
9
10
11
12
13
14
15
16
17
18
19
20
21
| 文档流
文档流,是指盒子按照html标签编写的顺序依次从上到下,从左到右排列,块元素占一行,行内元素在一行之内从左到右排列,先写的先排列,后写的排在后面,每个盒子都占据自己的位置。
浮动特性
1、浮动元素有左浮动(float:left)和右浮动(float:right)两种
2、浮动的元素会向左或向右浮动,碰到父元素边界、浮动元素、未浮动的元素才停下来
3、相邻浮动的块元素可以并在一行,超出父级宽度就换行
4、浮动让行内元素或块元素自动转化为行内块元素
5、浮动元素后面没有浮动的元素会占据浮动元素的位置,没有浮动的元素内的文字会避开浮动的元素,形成文字饶图的效果
6、父元素内整体浮动的元素无法撑开父元素,需要清除浮动
7、浮动元素之间没有垂直margin的合并
清除浮动
• 父级上增加属性overflow:hidden
• 在最后一个子元素的后面加一个空的div,给它样式属性 clear:both(不推荐)
• 使用成熟的清浮动样式类,clearfix
• .clearfix:after,.clearfix:before{ content: "";display: table;}
• .clearfix:after{ clear:both;}
• .clearfix{zoom:1;}
清除浮动的使用方法:
.con2{... overflow:hidden}
或者
<div class="con2 clearfix">
|
浮动示例
1
2
3
4
5
6
7
8
9
10
11
12
13
14
15
16
17
18
19
20
21
22
23
24
25
26
27
28
29
30
31
32
33
34
| <!DOCTYPE html>
<html lang="en">
<head>
<meta charset="UTF-8">
<title>浮动</title>
<style>
.box{
width: 200px;
height: 200px;
background-color: gold;
border: 1px solid #000;
text-align: center;
line-height: 200px;
margin: 20px;
}
.box-left{
float: left;
}
.box-right{
float: right;
}
</style>
</head>
<body>
<div class="box box-left">内容一</div>
<div class="box box-left">内容二</div>
<div class="box box-left">内容三</div>
<div class="box box-right">内容四</div>
<div class="box box-left">内容五</div>
<div class="box box-right">内容六</div>
<div class="box box-left">内容七</div>
<div class="box box-right">内容八</div>
</body>
</html>
|
文字环绕
1
2
3
4
5
6
7
8
9
10
11
12
13
14
15
16
17
18
19
20
21
22
23
24
25
26
27
28
29
30
31
32
33
34
35
36
37
| <!DOCTYPE html>
<html lang="en">
<head>
<meta charset="UTF-8">
<title>文字环绕</title>
<style>
.box{
width: 400px;
height: 400px;
border: 1px solid #000;
margin: 100px auto 0;
overflow: scroll;
}
.pic{
width: 150px;
height: 150px;
float: left;
margin: 0 10px 5px 0;
}
.person{
width: 400px;
height: 400px;
background-color: gold;
}
</style>
</head>
<body>
<div class="box">
<div class="pic"><img src="https://gss0.bdstatic.com/94o3dSag_xI4khGkpoWK1HF6hhy/baike/w%3D268%3Bg%3D0/sign=27a6723e4c2309f7e76faa144a356bce/9e3df8dcd100baa1a5fd20114d10b912c9fc2e42.jpg" alt="" width="150px" height="150px"></div>
<div class="person">
科比·布莱恩特(Kobe Bryant),1978年8月23日出生于美国宾夕法尼亚州费城,前美国职业篮球运动员,司职得分后卫/小前锋(锋卫摇摆人),绰号“黑曼巴”/“小飞侠”。 [1] 1996年第1轮第13位被夏洛特黄蜂队选中,后来被交易到湖人队。整个NBA生涯(1996年-2016年)全部效力于NBA洛杉矶湖人队,是前NBA球员乔·布莱恩特的儿子 [1] 。
科比是NBA最好的得分手之一,生涯赢得无数奖项 [1] ,突破、投篮、罚球、三分球他都驾轻就熟,几乎没有进攻盲区,单场比赛81分的个人纪录就有力地证明了这一点。除了疯狂的得分外,科比的组织能力也很出众,经常担任球队进攻的第一发起人。另外科比还是联盟中最好的防守人之一,贴身防守非常具有压迫性。
2016年4月14日,科比·布莱恩特在生涯最后一场主场对阵爵士的常规赛后宣布退役。 [1] 2017年12月19日,湖人主场对阵勇士,中场时刻为科比的8号和24号2件球衣举行了退役仪式。 [2] 2018年3月13日,科比凭借和动画师格兰·基恩合作的短片《亲爱的篮球》获得第90届奥斯卡最佳短片奖。 [3]
</div>
</div>
</body>
</html>
|
清除浮动
1
2
3
4
5
6
7
8
9
10
11
12
13
14
15
16
17
18
19
20
21
22
23
24
25
26
27
28
29
30
31
32
33
34
35
36
37
38
39
40
41
42
43
44
45
46
47
48
49
50
51
52
53
54
55
56
57
58
59
60
61
62
63
64
65
66
67
68
69
| <!DOCTYPE html>
<html lang="en">
<head>
<meta charset="UTF-8">
<title>清除浮动</title>
<style>
.con, .con2, .con3{
width: 300px;
border: 1px solid #000;
margin: 100px auto 0;
}
/* .con2{
overflow: hidden;
}*/
.con a{
width: 50px;
height: 50px;
display: inline-block;
line-height: 50px;
margin: 10px;
text-align: center;
background-color: gold;
text-decoration: none;
}
.con2 a{
width: 50px;
height: 50px;
background-color: gold;
margin: 10px;
text-align: center;
line-height: 50px;
text-decoration: none;
float: left;
}
.clearfix:after,.clearfix:before{
content: "";
display: table;
}
.clearfix:after{
clear:both;
}
.clearfix{
zoom:1;
}
</style>
</head>
<body style="height: 2000px;">
<div class="con">
<a href="">1</a>
<a href="">2</a>
<a href="">3</a>
<a href="">4</a>
<a href="">5</a>
<a href="">6</a>
<a href="">7</a>
<a href="">8</a>
</div>
<div class="con2 clearfix">
<a href="">1</a>
<a href="">2</a>
<a href="">3</a>
<a href="">4</a>
<a href="">5</a>
<a href="">6</a>
<a href="">7</a>
<a href="">8</a>
</div>
</body>
</html>
|
十一、定位
1
2
3
4
5
6
7
8
9
10
11
12
13
14
15
16
17
18
19
20
21
22
| 关于定位
我们可以使用css的position属性来设置元素的定位类型,postion的设置项如下:
• relative 生成相对定位元素,元素所占据的文档流的位置不变,元素本身相对文档流的位置进行偏移
• absolute 生成绝对定位元素,元素脱离文档流,不占据文档流的位置,可以理解为漂浮在文档流的上方,相对于上一个设置了相对或者绝对或者固定定位的父级元素来进行定位,如果找不到,则相对于body元素进行定位。
• fixed 生成固定定位元素,元素脱离文档流,不占据文档流的位置,可以理解为漂浮在文档流的上方,相对于浏览器窗口进行定位。
• static 默认值,没有定位,元素出现在正常的文档流中,相当于取消定位属性或者不设置定位属性
• inherit 从父元素继承 position 属性的值
定位元素特性
绝对定位和固定定位的块元素和行内元素会自动转化为行内块元素
使用margin属性布局绝对定位元素
当元素绝对定位以后,它在父元素的位置是根据top/left/right/bottom来定位的,而margin是根据自身当前位置来定位的
此情况,margin-bottom 和margin-right的值不再对文档流中的元素产生影响,因为该元素已经脱离了文档流。另外,不管它的祖先元素有没有定位,都是以文档流中原来所在的位置上偏移参照物。
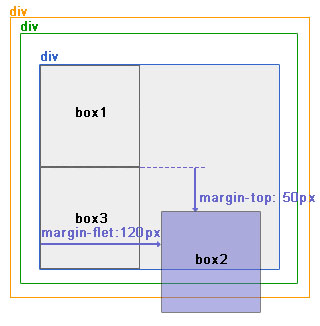
图9中,使用margin属性布局相对定位元素。
层级关系为:
<div ——————————— position:relative;
<div—————————-没有设置为定位元素,不是参照物
<div———————-没有设置为定位元素,不是参照物
<div box1
<div box2 ——–position:absolute; margin-top:50px; margin-left:120px;
<div box3
|
“
1
2
3
4
5
6
7
8
| 定位元素层级
定位元素是浮动的正常的文档流之上的,可以用z-index属性来设置元素的层级
注:常用父元素设置为position:relative,儿子设置成position:absolute相对于父元素进行绝对定位。
典型定位布局
1、固定在顶部的菜单
2、水平垂直居中的弹框
3、固定的侧边的工具栏
4、固定在底部的按钮
|
定位示例
1
2
3
4
5
6
7
8
9
10
11
12
13
14
15
16
17
18
19
20
21
22
23
24
25
26
27
28
29
30
31
32
33
34
35
36
37
38
39
40
41
42
43
44
45
46
47
48
49
50
51
52
53
54
| <!DOCTYPE html>
<html lang="en">
<head>
<meta charset="UTF-8">
<title>定位</title>
<style>
.con{
width: 400px;
height: 400px;
border: 1px solid #000;
margin: 100px auto 0;
position: relative;
}
.con div, .box4{
width: 200px;
height: 100px;
margin: 20px;
background-color: gold;
line-height: 100px;
text-align: center;
font-size: 40px;
}
.con .box1{
position: relative;
left: 50px;
top: 50px;
background-color: green;
z-index: 2;
}
.con .box2{
position: absolute;
left: 0px;
top: 0px;
background-color: red;
z-index: 1;
}
.box4{
background-color: pink;
position: fixed;
right: 0px;
top: 0px;
}
</style>
</head>
<body>
<div class="con">
<div class="box1">1</div>
<div class="box2">2</div>
<div class="box3">3</div>
</div>
<div class="box4">4</div>
</body>
</html>
|
十二、块元素、内联元素、内联块元素
1
2
3
4
5
6
7
8
9
10
11
12
13
14
15
16
17
18
19
20
21
22
23
24
25
26
27
28
29
30
31
32
| 元素就是标签,布局中常用的有三种标签,块元素、内联元素、内联块元素,了解这三种元素的特性,才能熟练的进行页面布局。
块元素
块元素,也可以称为行元素,布局中常用的标签如:div、form、table、p、pre、h1~h5、dl、ol、ul等等都是块元素,它在布局中的行为:
• 支持全部的样式
• 如果没有设置宽度,默认的宽度为父级宽度100%
• 盒子占据一行、即使设置了宽度
内联元素
内联元素,也可以称为行内元素,布局中常用的标签如:span、a、strong、em、label、input、select、textarea、img、br等等都是内联元素,它们在布局中的行为:
支持部分样式(不支持宽、高、margin上下、padding上下)
• 宽高由内容决定
• 盒子并在一行
• 代码换行,盒子之间会产生间距
• 子元素是内联元素,父元素可以用text-align属性设置子元素水平对齐方式,用line-height属性值设置垂直对齐方式
内联块元素
内联块元素,也叫行内块元素,是新增的元素类型,现有元素没有归于此类别的,img和input元素的行为类似这种元素,但是也归类于内联元素,我们可以用display属性将块元素或者内联元素转化成这种元素。它们在布局中表现的行为:
• 支持全部样式
• 如果没有设置宽高,宽高由内容决定
• 盒子并在一行
• 代码换行,盒子会产生间距
• 子元素是内联块元素,父元素可以用text-align属性设置子元素水平对齐方式,用line-height属性值设置子元素垂直对齐方式
这三种元素,可以通过display属性来相互转化,不过实际开发中,块元素用得比较多,所以我们经常把内联元素转化为块元素,少量转化为内联块,而要使用内联元素时,直接使用内联元素,而不用块元素转化了。
display属性
display属性是用来设置元素的类型及隐藏的,常用的属性有:
1、none 元素隐藏且不占位置
2、block 元素以块元素显示
3、inline 元素以内联元素显示
4、inline-block 元素以内联块元素显示
解决内联元素间隙的方法
1、去掉内联元素之间的换行
2、将内联元素的父级设置font-size为0,内联元素自身再设置font-size
3. 将父元素的word-spacing:-5px;
4. margin:-3px;
|
补充:
1
2
3
| 透明度:opacity: 1; 0-1
手心图标:cursor: pointer;
边框圆润度:border-radius: 15%; 0 - 100%
|
布局实例
个人简历.html
1
2
3
4
5
6
7
8
9
10
11
12
13
14
15
16
17
18
19
20
21
22
23
24
25
26
27
28
29
30
31
32
33
34
35
36
37
38
39
40
41
42
43
44
45
46
47
48
49
50
51
52
53
54
55
56
57
58
59
60
61
62
63
64
65
66
67
68
69
70
71
72
73
74
75
76
77
78
79
80
81
82
83
84
85
86
87
88
89
90
91
92
93
94
95
96
97
98
99
100
101
102
103
104
105
106
107
108
109
110
111
112
113
114
115
116
117
118
119
120
121
122
123
124
125
126
127
128
129
130
131
132
133
134
135
136
137
138
139
140
141
142
143
144
145
146
147
148
149
150
151
152
153
154
155
156
157
158
159
160
161
162
163
164
165
166
167
168
169
170
171
172
173
174
175
176
177
178
179
180
181
182
183
184
185
186
187
188
189
190
191
192
193
194
195
196
197
198
199
200
201
202
203
204
205
206
207
208
209
210
211
212
| <!DOCTYPE html>
<html lang="en">
<head>
<meta charset="UTF-8">
<title>个人简历</title>
<link href="https://cdn.bootcss.com/font-awesome/4.7.0/css/font-awesome.min.css" rel="stylesheet">
<style>
.side-bar{
width: 20%;
height: 100%;
background-color: rgb(37,70,101);
float: left;
}
.main{
width: 80%;
height: 100%;
float: left;
}
.header{
padding: 20px 15px;
}
.header, .personal{
height: 200px;
}
.header .avatar{
display: block;
border: 5px solid #fff;
margin: 0 auto;
position: relative;
overflow: hidden;
width: 128px;
height: 128px;
border-radius: 50%;
}
.avatar img{
max-width: 100%;
}
.side-bar .content{
color: white;
}
.personal .content{
width: 100%;
margin: 10px auto 0 20px;
}
.personal .content span{
color: #fff;
font-family: "微软雅黑";
line-height: 26px;
}
.evaluation{
height: 200px;
}
.evaluation .content{
text-indent: 20px;
padding: 5px 10px;
}
.name, .info{
text-align: center;
color: white;
margin: 10px auto;
}
.per-header, .eva-header, .hob-header{
height: 50px;
background-color: rgb(91,155,213);
color: white;
text-align: center;
line-height: 50px;
letter-spacing: 10px;
}
.main{
margin: 20px 0;
}
.main .education, .main .skill, .main .project, .main .honor{
min-height: 150px;
}
.edu-header, .sk-header, .pro-header, .hon-header{
margin-left: 20px;
font-size: 20px;
font-weight: bolder;
padding-bottom: 10px;
border-bottom: 1px solid #000;
}
.main .content{
text-align: left;
padding: 5px 30px;
}
.main .content p{
margin: 7px auto;
}
.hobby .content table{
width: 80%;
margin: 5px auto;
text-align: center;
}
.hobby .content span{
display: inline-block;
padding: 7px 20px;
}
</style>
</head>
<body>
<div class="side-bar">
<div class="header">
<a href="" class="avatar">
<img src="kobe.jpg" alt="" width="128px" height="128px;">
</a>
<div class="name">科比</div>
<div class="info">NBA篮球巨星</div>
</div>
<div class="personal">
<div class="per-header">个人简介</div>
<div class="content">
<span><i class="fa fa-user-o"></i> : 美国公民</span><br>
<span><i class="fa fa-vcard-o"></i> : 1978.08.23</span><br>
<span><i class="fa fa-map-marker"></i> : 费城</span><br>
<span><i class="fa fa-phone"></i> : 666666666</span><br>
<span><i class="fa fa-envelope-o"></i> : kobe@qq.com</span><br>
</div>
</div>
<div class="evaluation">
<div class="eva-header">个人评价</div>
<div class="content">
球场就是战场,唯有突破自我才能成为这场硬仗的主角,而坚持是强者的性格,是赢家的秘籍,是科比身上最高的斗战奥义,有一种坚持,叫 科比•布莱恩特!.
</div>
</div>
<div class="hobby">
<div class="hob-header">兴趣爱好</div>
<div class="content">
<table>
<tbody>
<tr>
<td><span><i class="fa fa-laptop fa-2x"></i></span></td>
<td><span><i class="fa fa-soccer-ball-o fa-2x"></i></span></td>
</tr>
<tr class="hobby-name">
<td><span>计算机</span></td>
<td><span>篮球</span></td>
</tr>
<tr>
<td><span><i class="fa fa-book fa-2x"></i></span></td>
<td><span><i class="fa fa-cab fa-2x"></i></span></td>
</tr>
<tr class="hobby-name">
<td><span>阅读</span></td>
<td><span>户外</span></td>
</tr>
<tr>
<td><span><i class="fa fa-pencil-square-o fa-2x"></i></span></td>
<td><span><i class="fa fa-music fa-2x"></i></span></td>
</tr>
<tr class="hobby-name">
<td><span>写作</span></td>
<td><span>音乐</span></td>
</tr>
</tbody>
</table>
</div>
</div>
</div>
<div class="main">
<div class="education">
<div class="edu-header"> <i class="fa fa-mortar-board"></i> 教育经历</div>
<div class="content">
<p><b>2014.09—2018.6 山西医科大学 信息管理与信息系统专业 </b></p>
<p>科比·布莱恩特(Kobe Bryant),1978年8月23日出生于美国宾夕法尼亚州费城,前美国职业篮球运动员,司职得分后卫/小前锋(锋卫摇摆人),绰号“黑曼巴”/“小飞侠”。 [1] 1996年第1轮第13位被夏洛特黄蜂队选中,后来被交易到湖人队。整个NBA生涯(1996年-2016年)全部效力于NBA洛杉矶湖人队,是前NBA球员乔·布莱恩特的儿子 [1] 。
</p>
</div>
</div>
<div class="skill">
<div class="sk-header"><i class="fa fa-wrench"></i> 专业技能</div>
<div class="content">
<p>1. 熟练使用Python, 熟悉R和go语言, 有一定的C、java基础。</p>
<p>2. 熟悉Python的Django、Flask等web框架,了解vue.js, 并可以进行相应web开发</p>
<p>3. 能熟练使用Python进行爬虫,熟悉scrapy框架,能够用多线程、进程、协程提高爬虫性能。熟练数据处理等相关操作</p>
<p> 4. 掌握机器学习常用算法的原理和实现</p>
<p>5. 主要研究方向为自然语言处理</p>
<p>6. 数据库:Mysql, redis和mongodb和sqlite3</p>
</div>
</div>
<div class="project">
<div class="pro-header"><i class="fa fa-pencil-square"></i> 项目(科研)经历</div>
<div class="content">
<p>2016.9参加全国大学生数学建模竞赛,并获得山西赛区的优秀奖</p>
<p>2016.10参加名称为《“医”动校园APP》创新创业校级项目,并顺利完成项目。</p>
<p>2017年12月于《智富时代》杂志发表题为《“医”动校园APP的设计与开发》的论文。</p>
<p>毕业设计自主开发山西医科大学知识问答平台(django2.0.5+python3.7+mysql5.7)
实现登录、退出功能,搜索、提问、回答问题功能,发布,编辑文章功能,给文章留言功能,个人中心可以修改密码,查看提问数、回答数、发布文章数,并可以删除我的提问,重新编辑或删除已发布文章,以及利用django自带admin实现用户,问答和文章的后台管理功能</p>
</div>
</div>
<div class="honor">
<div class="hon-header"><i class="fa fa-glass"></i> 奖项荣誉</div>
<div class="content">
<p>21世纪头10年最佳NBA球员</p>
<p>奥运会冠军:2次(2008年北京奥运会,2012年伦敦奥运会) [233] </p>
<p>NBA总冠军:5次(2000,2001,2002,2009,2010) [234-237] </p>
<p>NBA得分王:2次(2006,2007) [238] </p>
<p>NBA西部冠军:7次(2000—2002,2004,2008—2010) [234-236] [239-240] </p>
<p>NBA总决赛MVP:2次(2009,2010) [159] </p>
<p>NBA常规赛MVP:1次(2008) [113] </p>
<p>NBA全明星赛MVP:4次(2002,2007,2009-与沙奎尔·奥尼尔共享,2011) [241] </p>
<p>NBA全明星赛扣篮大赛冠军:1次(1997) [242] </p>
<p>NBA全明星:18次(1998,2000—2016)(注:1999年因劳资纠纷,比赛未举办 </p>
<p>2010年达拉斯全明星赛、2014年新奥尔良全明星赛因伤退出) [73] [243] </p>
</div>
</div>
</div>
</body>
</html>
|