001-python时间计算 1 2 3 4 https://blog.csdn.net/u012089823/article/details/79849502 now = lambda: time .time() start = now() # 在同一个程序中,start 的值随系统时间动态变化 now()-start
002-python多进程并发 https://www.cnblogs.com/garfieldcgf/p/8324852.html
https://www.cnblogs.com/rexcheny/p/9427209.html
http://www.ruanyifeng.com/blog/2013/04/processes_and_threads.html (进程与线程的一个简单解释)
由于Python下调用Linux的Shell命令都需要等待返回,所以常常我们设置的多线程都达不到效果,http://www.coder4.com/archives/3352
Python提供了非常好用的多进程包multiprocessing,你只需要定义一个函数,Python会替你完成其他所有事情。
1、新建单一进程
1 2 3 4 5 6 7 8 9 10 11 12 13 import multiprocessingimport timedef func (msg) for i in xrange(3 ): print msg time.sleep(1 ) if __name__ == "__main__" : p = multiprocessing.Process (target=func , args =("hello" , ) p.start() p.join () print "Sub-process done."
2、使用进程池
processes=4是最多并发进程数量。
1 2 3 4 5 6 7 8 9 10 11 12 13 14 15 16 import multiprocessing import time def func(msg): for i in xrange(3): print msg time.sleep(1) if __name__ == "__main__" : pool = multiprocessing.Pool(processes =4) for i in xrange(10): msg = "hello %d" %(i) pool.apply_async(func, (msg, )) pool.close() pool.join() print "Sub-process(es) done."
3、使用Pool,并需要关注结果
更多的时候,我们不仅需要多进程执行,还需要关注每个进程的执行结果,如下:
1 2 3 4 5 6 7 8 9 10 11 12 13 14 15 16 17 18 19 20 import multiprocessing import time def func(msg): for i in xrange(3): print msg time.sleep(1) return "done " + msg if __name__ == "__main__" : pool = multiprocessing.Pool(processes =4) result = [] for i in xrange(10): msg = "hello %d" %(i) result.append(pool.apply_async(func, (msg, ))) pool.close() pool.join() for res in result: print res.get () print "Sub-process(es) done."
根据网友评论中的反馈,在Windows下运行有可能崩溃(开启了一大堆新窗口、进程),可以通过如下调用来解决:
1 multiprocessing .freeze_support ()
附录(自己的脚本):
1 2 3 4 5 6 7 8 9 10 11 12 13 14 15 16 17 18 19 20 21 22 23 24 25 26 27 28 29 30 31 32 33 34 35 36 37 38 39 40 41 42 43 44 45 46 47 #!/usr/bin/python import threading import subprocess import datetime import multiprocessing def dd_test(round , th ): test_file_arg = 'of=/zbkc/test_mds_crash/1m_%s_%s_{}' %(round , th ) command = "seq 100 | xargs -i dd if=/dev/zero %s bs=1M count=1" %test_file_arg print command subprocess.call (command ,shell =True,stdout=open ('/dev/null' ,'w' ),stderr=subprocess.STDOUT) def mds_stat(round ): p = subprocess.Popen("zbkc mds stat" , shell = True, stdout = subprocess.PIPE) out = p .stdout.readlines() if out[0 ].find ('active' ) != -1 : command = "echo '0205pm %s round mds status OK, %s' >> /round_record" %(round , datetime.datetime.now()) command_2 = "time (ls /zbkc/test_mds_crash/) 2>>/round_record" command_3 = "ls /zbkc/test_mds_crash | wc -l >> /round_record" subprocess.call (command ,shell =True) subprocess.call (command_2,shell =True) subprocess.call (command_3,shell =True) return 1 else : command = "echo '0205 %s round mds status abnormal, %s, %s' >> /round_record" %(round , out[0 ], datetime.datetime.now()) subprocess.call (command ,shell =True) return 0 #threads = [] for round in range (1 , 1600 ): pool = multiprocessing.Pool(processes = 10 ) #使用进程池 for th in range (10 ): # th_name = "thread-" + str(th ) # threads.append (th_name) #添加线程到线程列表 # threading.Thread(target = dd_test, args = (round , th ), name = th_name).start() #创建多线程任务 pool.apply_async(dd_test, (round , th )) pool.close () pool.join () #等待线程完成 # for t in threads: # t.join () if mds_stat(round ) == 0 : subprocess.call ("zbkc -s" ,shell =True) break
003-Python获取多线程返回结果 https://www.cnblogs.com/freeaihub/p/13401920.html
本文转自https://www.freeaihub.com/article/threading-return-in-python.html,该页可在线运行以下实例
Python的thread模块,是不支持守护线程的。当主线程退出的时候,所有的子线程都将终止,不管他们是否仍在工作。本节我们开始介绍python的另外多线程模块threading,该模块支持守护线程,其工作方式:守护线程一般是一个等待客户端请求的服务器。如果没有客户端请求,守护线程就是空闲的。如果把一个线程设置为守护线程,就表示这个线程是不重要的,进程退出时不需要等待这个线程执行完成。
threading模块除了Thread类之外,还包括许多好用的同步机制:
对象 描述
Thread
表示一个执行线程的对象
Lock
锁对象
RLock
可重入锁对象,使单一线程可以(再次)获得已持有的锁(递归锁)
Condition
条件变量对象,使得一个线程等待另外一个线程满足特定的条件,比如改变状态或者某个数据值
Event
条件变量的通用版本,任意数量的线程等待某个事件的发生,在该事件发生后所有的线程都将被激活
Semaphore
为线程间的有限资源提供一个计数器,如果没有可用资源时会被阻塞
BoundedSemaphore
于Semaphore相似,不过它不允许超过初始值
Timer
于Thread类似,不过它要在运行前等待一定时间
Barrier
创建一个障碍,必须达到指定数量的线程后才可以继续
其中,Thread类是threading模块的主要执行对象。
下面是Thread类的属性和方法列表:
属性 描述
Thread类属性
name
线程名
ident
线程的标识符
daemon
布尔值,表示这个线程是否是守护线程
Thread类方法
init (group=None,target=None,name=None,args=(),kwargs={},verbose=None,daemon=None)实例化一个线程对象,需要一个可调用的target对象,以及参数args或者kwargs。还可以传递name和group参数。daemon的值将会设定thread.daemon的属性
start()
开始执行该线程
run()
定义线程的方法。(通常开发者应该在子类中重写)
join(timeout=None)
直至启动的线程终止之前一直挂起;除非给出了timeout(单位秒),否则一直被阻塞
getName()
返回线程名(该方法已被弃用)
setName()
设定线程名(该方法已弃用)
isAlive
布尔值,表示这个线程是否还存活(驼峰式命名,python2.6版本开始已被取代)
isDaemon()
布尔值,表示是否是守护线程(已经弃用)
setDaemon(布尔值)
在线程start()之前调用,把线程的守护标识设定为指定的布尔值(已弃用)
使用Thread类,可以有多种方法创建线程:
创建Thread类的实例,传递一个函数
创建Thread类的实例,传递一个可调用的类实例
派生Thread类的子类,并创建子类的实例
一般的,我们会采用第一种或者第三种方法。如果需要一个更加符合面向对象的接口时,倾向于选择第三种方法,否则就用第一种方法吧。
第一种方法:创建Thread类,传递一个函数
下面的脚本中,我们先实例化Thread类,并传递一个函数(及其参数),当线程执行的时候,函数也会被执行:
1 2 3 4 5 6 7 8 9 10 11 12 13 14 15 16 17 18 19 20 21 22 23 24 25 import threadingfrom time import sleep,ctimeloops=[4 ,2 ] def loop (nloop,nsec) : print('开始循环' ,nloop,'at:' ,ctime()) sleep(nsec) print('循环' ,nloop,'结束于:' ,ctime()) def main () : print('程序开始于:' ,ctime()) threads=[] nloops=range(len(loops)) for i in nloops: t=threading.Thread(target=loop,args=(i,loops[i])) threads.append(t) for i in nloops: threads[i].start() for i in nloops: threads[i].join() print('任务完成于:' ,ctime()) main()
和thread模块相比,不同点在于:实现同样的效果,thread模块需要锁对象,而threading模块的Thread类不需要。实例化Thread(调用Thread())和调用thread.start_new_thread()的最大区别就是新线程不会立即执行!这是一个非常有用的同步功能,尤其在我们不希望线程立即开始执行的时候。
当所有的线程都分配完成之后,通过调用每个线程的start()方法再让他们开始。相比于thread模块的管理一组锁(分配、获取、释放检查锁状态)来说,threading模块的Thread类只需要为每个线程调用join()方法即可。join(timeout=None)方法将等待线程结束,或者是达到指定的timeout时间时。这种锁又称为自旋锁。
最重要的是:join()方法,其实你根本不需要调用它。一旦线程启动,就会一直执行,直到给定的函数完成后退出。如果主线程还有其他事情要做(并不需要等待这些线程完成),可以不调用join()。join()只有在你需要等待线程完成时候才是有用的。
例如上面的脚本中,我们注释掉join()代码:
1 2 3 4 5 6 7 8 9 10 11 12 13 14 15 16 17 18 19 20 21 22 23 24 25 26 27 28 import threadingfrom time import sleep,ctimeloops=[4 ,2 ] def loop (nloop,nsec) : print('开始循环' ,nloop,'at:' ,ctime()) sleep(nsec) print('循环' ,nloop,'结束于:' ,ctime()) def main () : print('程序开始于:' ,ctime()) threads=[] nloops=range(len(loops)) for i in nloops: t=threading.Thread(target=loop,args=(i,loops[i])) threads.append(t) for i in nloops: threads[i].start() print('任务完成于:' ,ctime()) main()
我们发现:主线程的任务比两个循环线程要先执行(任务完成于……在 循环X结束……的前面)
第二种方法:创建Thread类的实例,传递一个可调用的类实例
创建线程时,于传入函数类似的方法是传入一个可调用的类的实例,用于线程执行——这种方法更加接近面向对象的多线程编程。比起一个函数或者从一个函数组中选择而言,这种可调用的类包含一个执行环境,有更好的灵活性。
在上述的mtsleepC.py脚本中添加一个新类ThreadFunc,稍微改动一番,形成mtsleepD.py文件:
1 2 3 4 5 6 7 8 9 10 11 12 13 14 15 16 17 18 19 20 21 22 23 24 25 26 27 28 29 30 31 32 33 34 35 36 37 38 39 import threadingfrom time import sleep,ctimeloops=[4 ,2 ] class ThreadFunc (object) : def __init__ (self,func,args,name='' ) : self.name=name self.func = func self.args=args def __call__ (self) : self.func(*self.args) def loop (nloop,nsec) : print('开始循环' ,nloop,'在:' ,ctime()) sleep(nsec) print('结束循环' ,nloop,'于:' ,ctime()) def main () : print('程序开始于:' ,ctime()) threads = [] nloops = range(len(loops)) for i in nloops: t = threading.Thread(target=ThreadFunc(loop,(i,loops[i]),loop.__name__)) threads.append(t) for i in nloops: threads[i].start() for i in nloops: threads[i].join() print('任务完成于:' ,ctime()) main()
上述脚本中,主要添加了ThreadFunc类,并在实例化Thread对象时,通过传参的形式同时实例化了可调用类ThreadFunc。这里同时完成了两个实例化。
我们研究一下创建ThreadFunc类的思想:我们希望这个类更加通用,而不是局限于loop()函数,为此,添加了一些新的东西,比如这个类保存了函数自身、函数的参数、以及函数名。构造函数init ()用于设定上述值。当创建新线程的时候,Thread类的代码将调用ThreadFunc对象,此时会调用call ()这个特殊方法。
(老实说,这种方法显得有些尴尬,并且稍微难以阅读)
第三种方法:派生Thread的子类,并创建子类的实例
和方法二相比,方法三再创建线程时使用子类要相对更容易阅读,下面是mtsleepE.py脚本:
1 2 3 4 5 6 7 8 9 10 11 12 13 14 15 16 17 18 19 20 21 22 23 24 25 26 27 28 29 30 31 32 33 34 35 36 37 38 39 40 import threadingfrom time import sleep,ctimeloops=[4 ,2 ] class MyThread (threading.Thread) : def __init__ (self,func,args,name='' ) : threading.Thread.__init__(self) self.name = name self.func = func self.args = args def run (self) : self.func(*self.args) def loop (nloop,nsec) : print('开始循环' ,nloop,'在:' ,ctime()) sleep(nsec) print('结束循环' ,nloop,'于:' ,ctime()) def main () : print('程序开始于:' ,ctime()) threads = [] nloops = range(len(loops)) for i in nloops: t = MyThread(loop,(i,loops[i]),loop.__name__) threads.append(t) for i in nloops: threads[i].start() for i in nloops: threads[i].join() print('所有的任务完成于:' ,ctime()) main()
比较方法二和方法三,重要的变化在于:MyThread子类的构造函数必须先调用其父类的构造函数;重写run()方法,代替方法二中的call ()方法。
优化第三种方法:
对MyThread类进行修改,增加一些调试信息的输出,另外,除了简单的调用函数外,还可以将结果保存在实例的属性self.res中,同时增加新的方法getResult()来获取这个值:
以下代码比较了递归求斐波那契、阶乘和累计函数的执行,分别按照单线程和多线程的方式执行同样的任务:
1 2 3 4 5 6 7 8 9 10 11 12 13 14 15 16 17 18 19 20 21 22 23 24 25 26 27 28 29 30 31 32 33 34 35 36 37 38 39 40 41 42 43 44 45 46 47 48 49 50 51 52 53 54 55 56 57 58 59 60 61 62 63 64 65 66 67 68 69 import threadingfrom time import ctime,sleepclass MyThread (threading.Thread) : def __init__ (self,func,args,name='' ) : threading.Thread.__init__(self) self.func = func self.name = name self.args = args def run (self) : print('开始执行' ,self.name,' 在:' ,ctime()) self.res = self.func(*self.args) print(self.name,'结束于:' ,ctime()) def getResult (self) : return self.res def fib (x) : sleep(0.005 ) if x < 2 : return 1 return fib(x-1 )+fib(x-2 ) def fac (x) : sleep(0.1 ) if x < 2 : return 1 return x*fac(x-1 ) def sum (x) : sleep(0.1 ) if x < 2 : return 1 return x + sum(x-1 ) funcs=[fib,fac,sum] n = 12 def main () : nfuncs = range(len(funcs)) print('单线程模式' ) for i in nfuncs: print('开始' ,funcs[i].__name__,' 在:' ,ctime()) print(funcs[i](n)) print(funcs[i].__name__,'结束于:' ,ctime()) print('多线程模式' ) threads = [] for i in nfuncs : t = MyThread(funcs[i],(n,),funcs[i].__name__) threads.append(t) for i in nfuncs: threads[i].start() for i in nfuncs: threads[i].join() print(threads[i].getResult()) print('所有的任务结束' ) main()
总结
程序中,为了看到多线程如何改善性能的,我们加入了sleep函数用于减慢执行速度。
看到单线程模式中,只是简单的一次调用每个函数,并在函数结束执行的时候立即显示相关的结果;而使用多线程的时候,并不会立刻显示结果,因为我们希望MyThread类越通用越好(有输出和无输出都能执行),我们一直等到所有线程都join之后,再调用getResult()方法显示每个函数的返回值。
004-python列表转字符串 https://www.cnblogs.com/who-care/p/9306800.html
005-去除列表重复字符串 1 2 3 4 5 6 7 8 9 10 11 12 13 14 15 16 17 18 19 20 21 22 23 24 25 26 27 28 29 30 31 32 33 34 35 36 37 38 39 40 来自比较容易记忆的是用内置的set l1 = ['b' ,'c' ,'d' ,'b' ,'c' ,'a' ,'a' ] l2 = list(set (l1)) print l2还有一种据说速度更快的,没测试过两者的速度差别 l1 = ['b' ,'c' ,'d' ,'b' ,'c' ,'a' ,'a' ] l2 = {}.fromkeys(l1).keys() print l2这两种都有个缺点,祛除重复元素后排序变了: ['a' , 'c' , 'b' , 'd' ] 如果想要保持他们原来的排序: 用list类的sort方法 l1 = ['b' ,'c' ,'d' ,'b' ,'c' ,'a' ,'a' ] l2 = list(set (l1)) l2.sort(key =l1.index) print l2也可以这样写 l1 = ['b' ,'c' ,'d' ,'b' ,'c' ,'a' ,'a' ] l2 = sorted(set (l1),key =l1.index) print l2也可以用遍历 l1 = ['b' ,'c' ,'d' ,'b' ,'c' ,'a' ,'a' ] l2 = [] for i in l1: if not i in l2: l2.append(i) print l2上面的代码也可以这样写 l1 = ['b' ,'c' ,'d' ,'b' ,'c' ,'a' ,'a' ] l2 = [] [l2.append(i) for i in l1 if not i in l2] print l2这样就可以保证排序不变了: ['b' , 'c' , 'd' , 'a' ]
006-生成多张图 http://blog.sina.cn/dpool/blog/s/blog_6cfd49b00102xhlu.html
1 2 3 4 5 6 7 8 9 10 11 12 13 14 15 16 17 18 19 20 21 22 23 24 25 26 27 单位电脑不能联网,离线安装Pyinstaller的时候费了一些周折,记录一下免得忘了。 环境:Python2.7.12 -×32 ,把能设成以管理员模式运行的都设上。 准备: 1 .future(https: //pypi.python .org/simple/future/,现在最新版是future-0.16 .0 .tar.gz)2 .pefile(https: //pypi.python .org/simple/pefile/,现在最新版是pefile-2016.3 .28 .zip)3 .pywin32(http://sourceforge.net/projects/pywin32/,现在最新版是pywin32-220 .win32-py2.7 .exe )总结: pip install future pip install pefile pip install pywin32 pip install dis3 下面用Pyinstaller生成一个可执行文件试试。 1 .在命令提示符中去到要打包的目录;2 .直接输入Pyinstaller-F-w 文件名.py (F大写);3 .文件目录出现新的文件夹,里面就是打包好的exe 文件了;-F,-onefile:打包成一个exe 文件w -windowed:使用窗口,无控制台 -c ,-console:无窗口,使用控制台 -D,-onedir:创建一个目录,包含exe 文件,但会依赖其他文件-icon=图标路径可以通过Pyinstaller-hi 来查看 网址: https: //jingyan.baidu.com /article/6 fb756ec71f73e241858fb2b.html https: //www.jianshu.com /p /2 c7c7dd602e2 https: //blog.csdn.net/weixin_43911278/article/details/90339738 https: //www.jianshu.com /p /2 c7c7dd602e2
007-python将资源文件一起打包进exe 讲解(有算例) https://blog.csdn.net/kobeyu652453/article/details/108732747
之前学习了打包。今天学习下如何打包带有资源的程序。python打包成exe 可执行文件 。教程 使用pipenv建立虚拟环境解决python打包exe文件过大的问题(附打包带图标,多个py文件打包exe)
今天讲下如何将资源文件一起打包。
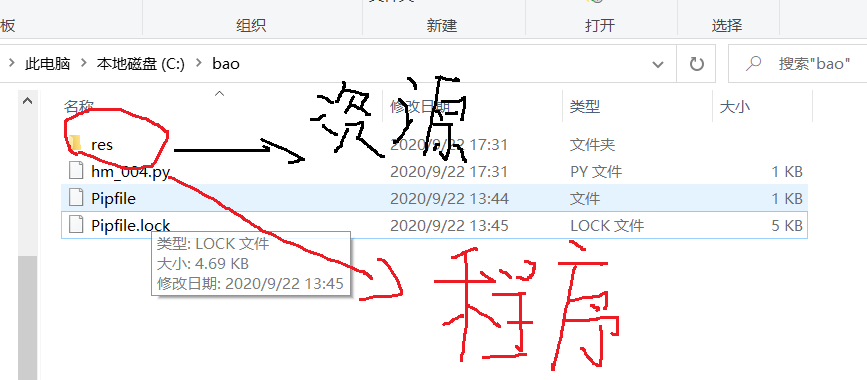
开先我给程序中的添加资源那部分代码,资源写上绝对路径。发现打包的exe可以运行,但是当我把资源文件移动后,发现打包的exe不能运行,这肯定不行呀,意味着我们无法把exe给其他小伙伴。然后我尝试啦下的新的方法。第一步:建立虚拟环境,安装相关库 使用pipenv建立虚拟环境解决python打包exe文件过大的问题(附打包带图标,多个py文件打包exe)
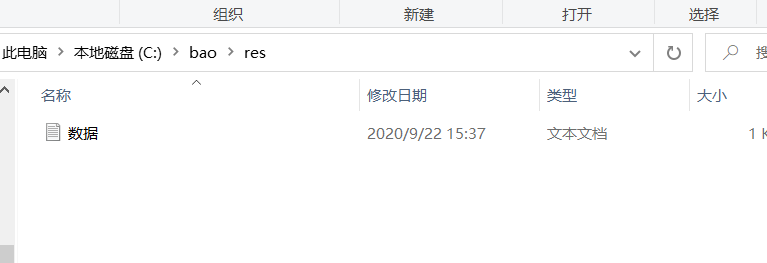
第二步:建立资源文件夹
官方说明:https://pythonhosted.org/PyInstaller/spec-files.html#spec-file-operation
第三步:修改.py文件
1 2 3 4 5 6 7 8 9 10 11 12 13 14 import sysimport osdef resource_path (relative_path) : if getattr(sys, 'frozen' , False ): base_path = sys._MEIPASS else : base_path = os.path.abspath("." ) return os.path.join(base_path, relative_path) filename = resource_path(os.path.join("res" ,"数据.txt" )) 12345678910111213
hm_004.py代码如下
1 2 3 4 5 6 7 8 9 10 11 12 13 14 15 16 17 18 19 20 21 import sysimport osdef resource_path (relative_path) : if getattr(sys, 'frozen' , False ): base_path = sys._MEIPASS else : base_path = os.path.abspath("." ) return os.path.join(base_path, relative_path) filename = resource_path(os.path.join("res" ,"数据.txt" )) print(filename) with open(filename,encoding='utf-8' ) as f: lines = f.readlines() print(lines) f.close() 1234567891011121314151617181920
第四步:打包exe
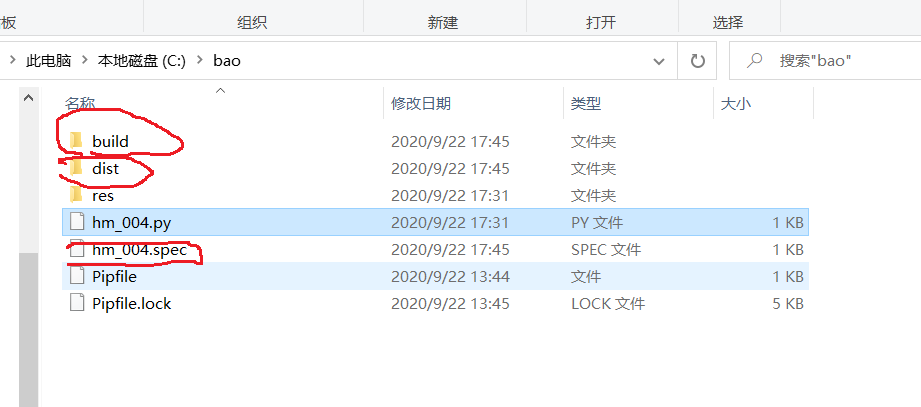
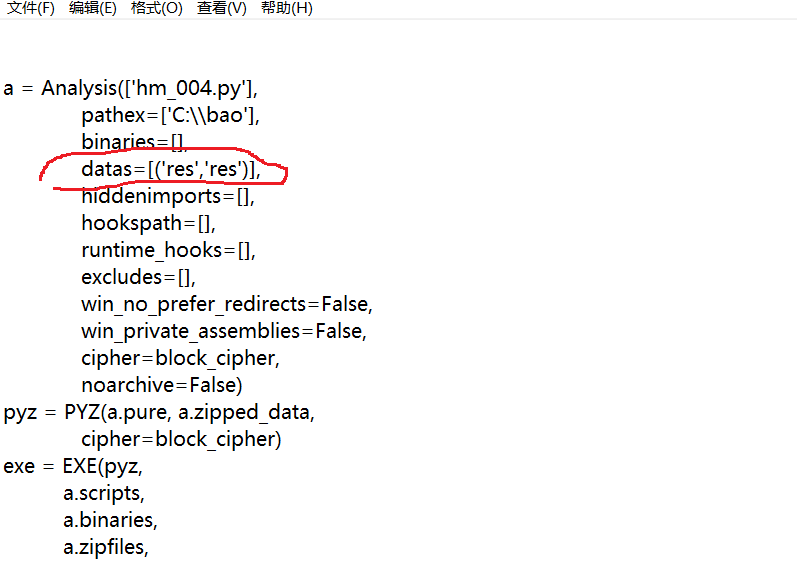
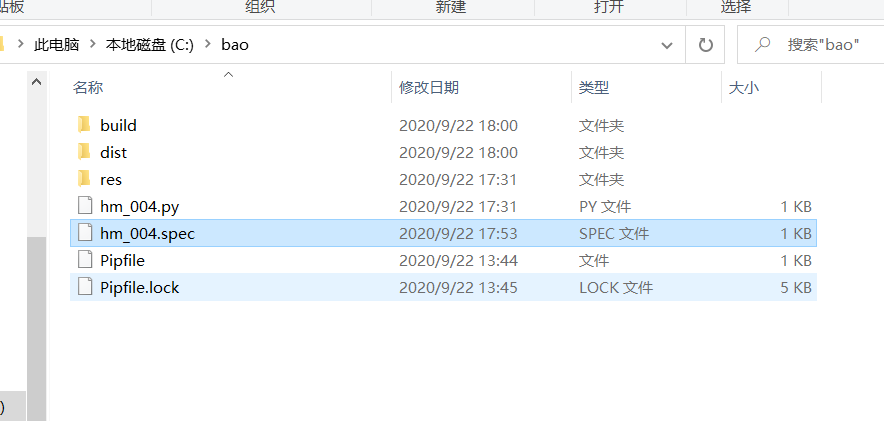
第五步:删除build,dist文件夹.修改spec
将hm_004.py当前目录下的res目录(及其目录中的文件)加入目标exe中,在运行时放在零时文件的根目录下,名称为res。
如果有多个资源
datas=[(‘res/bg.jpg’, ‘res’), (‘exam.db’, ‘.’)]
第六步:再次打包exe
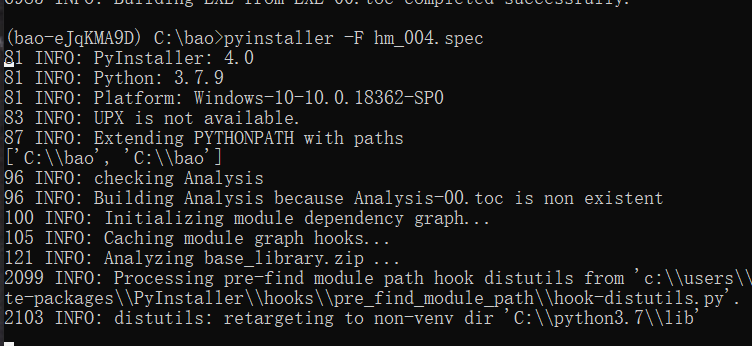
1 2 pyinstaller -F hm_004.spec 1
会再次生成build,dist文件。没有新生成spec啦
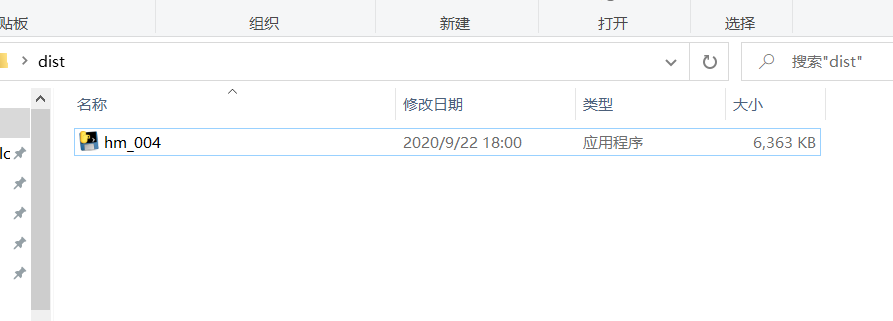
dist 文件
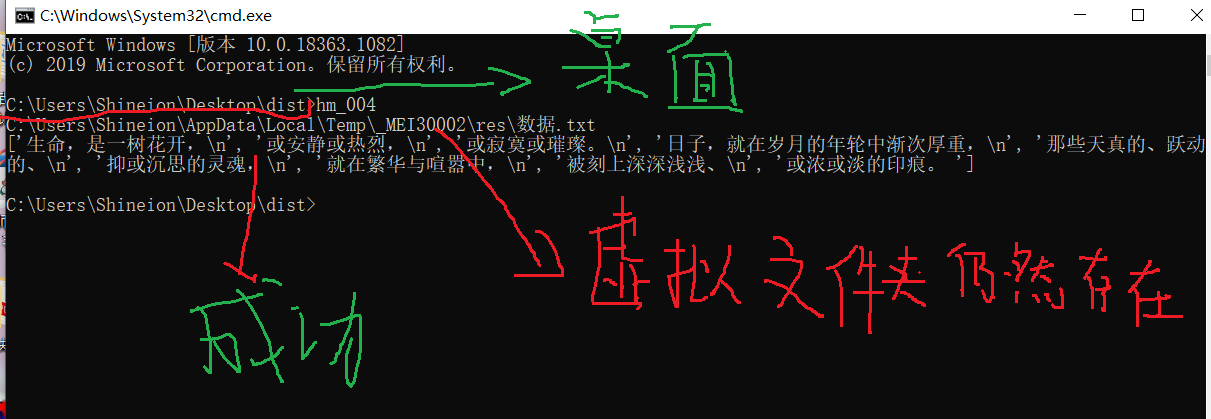
第七步:运行exe
结果如下:发现文件路径和原始数据.txt绝对路径不一样啦。
发送给其他小伙伴尝试运行
再次运行:
其他
由于现实生活中,我们的任务一般都很复杂,如涉及模型等。需要下载tensorflow等。python 安装第三方包
哪些打包步骤都如之前的教程。不同的是因为需要的包太多了,包与包之间不兼容。如打包需要keras库,而Keras又需要tesorflow,打包过程中却显示tensorflow版本必须大于2.0。
sklearn模型打包讲解python打包exe 之打包sklearn模型中的各种坑及其解决方法。
深度学习模型打包教程python打包exe之打包深度学习模型踩坑记录及其解决办法。
008-国内python源 1 2 3 4 5 6 7 8 9 10 11 12 13 14 国内python源: https: https: 有时候安装一些依赖包,网不好,直接超时,或者这个包就是死都下不下来的时候,可以指定国内源镜像。 pip install -i 国内镜像地址 包名 e.g. pip install -i http: 清华:https: 阿里云:http: 中国科技大学 https: 华中理工大学:http: 山东理工大学:http: 豆瓣:http: note:新版ubuntu要求使用https源,要注意。 部分信息转自:https:
009-python执行Linux命令 1 2 3 4 5 6 7 8 9 10 11 12 13 14 15 用python执行Linux命令 https://www.cnblogs.com/clhac/p/3708166.html import subprocess subprocess.call(["ls","-l"]) import os com="grep -v \"[a-Z ]\" "+PATH+"logfile.html|awk \'{$1=\"\";print $0}\'|sed \'s/^[ \t ]*//\'|sed \'s/[ ][ ]* /,/g\'|sed \'/^\s*$/d\'|sed \'/* /d' >>" +PATH+"/map.txt" os.system(com) import commands (status, output) = commands.getstatusoutput('ls -l') print output print status, output
010-python脚本传递参数 1 2 3 4 5 6 7 8 9 10 11 12 13 https: //www.cnblogs.com /lijunjiang2015/p /7689492 .html 给python 程序传递参数 运行python 脚本时有时需要执行实传递参数 在linux下: [root@Test ~]# cat /opt /python .py #!/usr/local/bin/python# -*- coding:utf -8 -*- import sys print (sys.argv [0 ]) #sys.argv [0 ] 类似于shell 中的$0 ,但不是脚本名称,而是脚本的路径 print (sys.argv [1 ]) #sys.argv [1 ] 表示传入的第一个参数,既 hello#运行结果: [root@Test ~]# python /opt /python .py hello /opt /python .py #打印argv [0 ] 脚本路径 hello #打印argv [1 ] 传入的参数 hello
011-将逗号分隔的字符串转换为Python中的列表 1 2 3 4 5 6 7 8 9 10 11 12 13 14 15 16 17 给定一个字符串: 它是由逗号分隔的几个值的序列: mStr = '192.168 .1 .1 ,192.168 .1 .2 ,192.168 .1 .3 ' 如何将字符串转换为列表? mStr = ['192.168 .1 .1 ', '192.168 .1 .2 ', '192.168 .1 .3 '] 使用str.split方法: >>> mStr = '192.168 .1 .1 ,192.168 .1 .2 ,192.168 .1 .3 ' >>> mStr.split("," ) ['192.168 .1 .1 ', '192.168 .1 .2 ', '192.168 .1 .3 '] 将字符串转成元组: >>> mlist = mStr.split("," ) >>> tuple(mlist) ('192.168 .1 .1 ', '192.168 .1 .2 ', '192.168 .1 .3 ') >>>
012-zip 1 2 3 4 5 6 7 8 9 10 11 12 13 14 15 16 17 18 19 20 21 22 zip实例: x = [1 , 2 , 3 ] y = [-1 , -2 , -3 ] # y = [i * -1 for i in x] zip(x, y) zip的结果如下: [(1 , -1 ), (2 , -2 ), (3 , -3 )] zip([seql, ...])接受一系列可迭代对象作为参数,将对象中对应的元素打包成一个个tuple(元组),然后返回由这些tuples组成的list(列表)。 进入正题:如何使用一个for 循环同时循环多个变量呢?使用tuple。如下,同时循环i和j变量。 for (i, j) in [(1 , 2 ), (2 , 3 ), (4 , 5 )]:print(i, j) 输出结果如下: (1 , 2 ) (2 , 3 ) (4 , 5 ) 所以我们如果要将x和y中的元素分别相加,则可以使用如下代码: for (i, j) in zip(x, y): print(i + j) 输出结果: 0 0
013-configparser python读配置文件 1 2 3 4 5 6 7 8 9 10 11 12 13 14 15 16 17 18 19 20 21 22 23 24 25 26 27 28 29 30 31 32 https: //pypi.org/project/configparser/#fileshttps: //www.cnblogs.com /hanmk/p /9843136 .htmlhttps: //www.cnblogs.com /feeland/p /4514771 .htmlhttps: //www.cnblogs.com /clement-jiao/p /9043110 .htmlhttps: //zixuephp.net/article-431 .htmlhttps: //blog.csdn.net/tadwork/article/details/80845599 今天把服务器上一个备份同步脚本放到老服务器上用,执行脚本后报错。import configparserImportError: No module named configparserpip安装configparser也没有,网上一查原来是python3 的,对应python2的是ConfigParser。修改代码try : import configparserexcept: import ConfigParser as configparser [root@ceph4 vdench]# cat config.ini [mysql] host = 127.0 .0.1 port = 3306 user = root password = Zhsy08241128 database = leartd [root@ceph4 vdench]# cat 2 .py # -*- coding:utf -8 -*- import os #import ConfigParser import ConfigParser # 项目路径 rootDir = os.path.split (os.path.realpath(__file__))[0 ] # config.ini文件路径 configFilePath = os.path.join (rootDir, 'config.ini' ) def get_config_values(section, option): "" 根据传入的section获取对应的value :param section: ini配置文件中用[]标识的内容 :return : "" config = ConfigParser.ConfigParser() config.read (configFilePath) # return config.items (section=section) return config.get (section=section, option=option) if __name__ == '__main__' : result = get_config_values('mysql' , 'port' ) print (result)
014-python换行写 1 2 3 with open ("new.txt" , "w" ) as f: f.write ("Hello World!" +"\n" ) f.write ("2" +"\n" )
015-enumerate() 函数 1 2 3 4 5 6 7 >>>seq = ['one' , 'two' , 'three' ] >>> for i, element in enumerate(seq): ... print i, element ... 0 one 1 two 2 three
016-matplotlib生成图表 1 2 3 4 5 6 7 8 https: //www.php.cn /python -tutorials-423909 .html 1 .进入到cmd窗口下python -m pip install -U pip setuptools --proxy http://xzproxy.cnsuning.com :8080 -i https: //pypi.tuna.tsinghua.edu.cn /simple/2 .接着键入进行自动的安装,系统会自动下载安装包。python -m pip install matplotlib --proxy http://xzproxy.cnsuning.com :8080 -i https: //pypi.tuna.tsinghua.edu.cn /simple/3 .安装完成后,可以用python -m pip list 查看本机的安装的所有模块,确保matplotlib已经安装成功。显示的界面为:
1 2 3 4 https: //www.cnblogs.com /dingjiaoyang/p /11579723 .html linux安装: yum install python -matplotlib.x86_64
python-matplotlib-1.2.0-15.el7.x86_64.rpm
1 2 3 4 5 6 7 8 9 10 11 12 13 14 15 16 17 002 -Linux服务器没有GUI的情况下使用matplotlib绘图https: 最近看到关于 python3 中用matplotlib 不进行交互画图,而是直接将图保存到硬盘,主要的一个设置就是 matplotlib.use('agg' ) 注明: 其实不设置 matplotlib.use('agg' ) 也可以把图片保存到硬盘,但是设置了这条语句再调用 matplotlib.pyplot.show 等进行交互式图片查看就会报错。 可以这么理解,设置了 matplotlib.use('agg' ) 后便强制你不能交互式查看显示图片,而只能保存到磁盘再查看。 下面对其进行一些介绍: import matplotlibmatplotlib.use('Agg' ) #而且matplotlib.use('Agg' )必须添加在 import matplotlib.pyplot 之前,否则无效 import matplotlib.pyplot as plt#最后在后面加上 plt.savefig('/tmp/figure_2_1.png' ) #就可以把绘制的图存为png,down到本地查看就行了
1 2 3 4 5 6 7 8 9 10 11 12 13 14 15 16 17 18 19 20 003 -读文件生成图表import matplotlib matplotlib.use('Agg' ) import matplotlib.pyplot as plt file = open ('map.txt' ) data = file .readlines() para_1 = [] para_2 = [] for num in data: para_1.append(float(num .split (',' )[0 ])) para_2.append(float(num .split (',' )[1 ])) plt.figure() plt.title('map' ) plt.plot(para_1, para_2) plt.savefig('./figure_2_1.png' )
1 2 3 4 5 6 7 8 9 10 11 12 13 14 15 16 17 18 004-生成多张图 import matplotlib matplotlib.use('Agg' ) import matplotlib.pyplot as plt from numpy import *x =linspace(-2,2)y1 =2*x+1y2 =x**2plt.figure() plt.plot(x,y1) plt.savefig('./1.png' ) plt.figure() plt.plot(x,y2,color ='red' ,linestyle='--') plt.savefig('./2.png' )
1 2 3 4 5 6 7 8 9 10 11 12 13 14 15 16 17 18 19 20 21 22 23 24 25 26 27 28 29 30 31 32 33 34 35 36 37 38 39 40 41 42 43 44 45 46 47 48 49 50 51 52 53 54 55 56 57 58 59 60 61 62 63 64 65 66 67 68 69 70 71 72 73 74 75 76 77 78 79 80 81 82 83 84 85 86 87 88 89 90 91 92 93 005-读文件生成多张图 import matplotlib matplotlib.use('Agg' ) import matplotlib.pyplot as plt file = open('map.txt' ) #打开文档 data = file.readlines() #读取文档数据 para_1 = [] #新建列表,用于保存第一列数据 para_2 = [] #新建列表,用于保存第二列数据 para_3 = [] for num in data: para_1.append(float(num.split(',' )[0])) para_2.append(float(num.split(',' )[1])) para_3.append(float(num.split(',' )[2])) plt.figure() plt.title('map' ) plt.plot(para_1, para_2) plt.savefig('./1.png' ) plt.figure() plt.plot(para_1, para_3) plt.savefig('./2.png' ) import matplotlib matplotlib.use('Agg' ) import matplotlib.pyplot as plt file = open('map.txt' ) #打开文档 data = file.readlines() #读取文档数据 para_1 = [] #新建列表,用于保存第一列数据 para_2 = [] #新建列表,用于保存第二列数据 para_3 = [] para_4 = [] para_5 = [] para_6 = [] for num in data: para_1.append(float(num.split(',' )[0])) para_2.append(float(num.split(',' )[1])) para_3.append(float(num.split(',' )[2])) para_4.append(float(num.split(',' )[4])) para_5.append(float(num.split(',' )[5])) para_6.append(float(num.split(',' )[6])) plt.figure() plt.title('IOPS' )#图片标题 plt.plot(para_1, para_2) plt.xlabel("second" )#x轴标题 plt.ylabel("tims" )#y轴标题 plt.figtext(0.75, 0.45, 'IOPS' , fontsize =40, color ='gray' , ha ='right' , va ='bottom' , alpha =0.4) plt.savefig('./1.png' ) plt.figure() plt.title('BW' ) plt.plot(para_1, para_3) plt.xlabel("second" ) plt.ylabel("MB/sec" ) plt.figtext(0.75, 0.45, 'BM' , fontsize =40, color ='gray' , ha ='right' , va ='bottom' , alpha =0.4) plt.savefig('./2.png' ) plt.figure() plt.title('RESP' ) plt.plot(para_1, para_4) plt.xlabel("second" ) plt.ylabel("resp/time" ) plt.figtext(0.75, 0.45, 'RESP' , fontsize =40, color ='gray' , ha ='right' , va ='bottom' , alpha =0.4) plt.savefig('./3.png' ) plt.figure() plt.title('READ-RESP' ) plt.plot(para_1, para_5) plt.xlabel("second" ) plt.ylabel("read/resp" ) plt.figtext(0.75, 0.45, 'READ-RESP' , fontsize =40, color ='gray' , ha ='right' , va ='bottom' , alpha =0.4) plt.savefig('./4.png' ) plt.figure() plt.title('WRITE-RESP' ) plt.plot(para_1, para_6) plt.xlabel("second" ) plt.ylabel("write/resp" ) plt.figtext(0.75, 0.45, 'WRITE-RESP' , fontsize =40, color ='gray' , ha ='right' , va ='bottom' , alpha =0.4) plt.savefig('./5.png' )
1 2 3 4 5 6 7 8 9 10 11 12 13 14 15 16 17 18 19 20 21 22 23 24 25 26 27 28 29 30 31 32 33 34 006 -生成图表写成函数import matplotlib matplotlib.use('Agg' ) import matplotlib.pyplot as plt file = open ('map.txt' ) data = file .readlines() para_1 = [] para_2 = [] para_3 = [] para_4 = [] para_5 = [] para_6 = [] for num in data: para_1.append(float(num .split (',' )[0 ])) para_2.append(float(num .split (',' )[1 ])) para_3.append(float(num .split (',' )[2 ])) para_4.append(float(num .split (',' )[4 ])) para_5.append(float(num .split (',' )[5 ])) para_6.append(float(num .split (',' )[6 ])) def figure_show(a ,x,y): plt.figure() plt.title(a ) plt.plot(x, y) plt.xlabel("second" ) plt.ylabel(a ) plt.figtext(0.75 , 0.45 , a , fontsize=40 , color='gray' , ha='right' , va='bottom' , alpha=0.4 ) plt.savefig(a +".png" ) figure_show('iops' ,para_1,para_2)
1 2 3 4 5 6 7 8 9 10 007 -报错解决直接报错:TypeError: cannot concatenate 'str' and 'int' objects 解决这个方法只有提前把num 转换为字符串类型,可以使用bytes 函数把int型转换为string 型。 代码: str = '你的分数是:' num = 82 num = bytes (num )text = str+num +'分 | 琼台博客' print text
017-python排序 1 2 3 4 5 6 7 8 9 10 11 12 13 14 15 16 17 18 19 20 21 22 23 24 bicyles = ['b' ,'e' ,'a' ,'h' ] print (bicyles)['b' , 'e' , 'a' , 'h' ] bicyles.sort() print (bicyles)['a' , 'b' , 'e' , 'h' ] bicyles.sort(reverse =True ) print (bicyles)['h' , 'e' , 'b' , 'a' ] bicyles.reverse() print (bicyles) #输出结果 ['a' , 'b' , 'e' , 'h' ] 此外,sort()方法的排序结果是不可逆转的,无法在恢复到原来的顺序,但是reverse()方法可以,只需要再次用reverse()方法。
018-从list中随机获取不同元素 1 2 3 4 5 6 7 import randomlist = [1 , 2 , 3 , 4 , 5 , 6 , 7 , 8 , 9 , 10 ] for i in range(3 ): slice = random.sample(list, 5 ) # 从list中随机获取5 个元素,作为一个片断返回 print(slice) print(list, '\n' ) # 原有序列并没有改变
019-python 动态变量创建 1 2 3 4 5 6 7 8 9 10 11 12 13 14 15 16 17 names = locals() for i in range(3 ): names['n' + str(i) ] = i print(n0, n1, n2 但是,使用中发现,如果动态创建的变量实在函数中创建的且最后需要被return 返回,则如下写法就不行,会提示没有定义n0等。 def () : names = locals() for i in range(3 ): names['n' + str(i) ] = i return n0,n1,n2 对于这种情况,上述的return 应该改写为 return names['n0' ],names['n1' ],names['n2' ]
020-strip() 方法用于移除字符串头尾指定的字符 1 2 3 4 5 6 7 8 9 10 11 12 13 14 15 16 17 18 19 20 21 22 23 24 25 26 27 28 Python strip() 方法用于移除字符串头尾指定的字符(默认为空格或换行符)或字符序列。 函数原型 声明:s为字符串,rm为要删除的字符序列 s.strip(rm) 删除s字符串中开头、结尾处,位于 rm删除序列的字符 s.lstrip(rm) 删除s字符串中开头处,位于 rm删除序列的字符 s.rstrip(rm) 删除s字符串中结尾处,位于 rm删除序列的字符 注意: 1 . 当rm为空时,默认删除空白符(包括'\n' , '\r' , '\t' , ' ' )例如: >> >a = ' 123' >> >a.strip()'123' >> >a = '\t\tabc' >> >a.strip()'abc' >> >a = 'sdff\r\n' >> >a.strip()'sdff' 2 .这里的rm删除序列是只要边(开头或结尾)上的字符在删除序列内,就删除掉。例如 : >> >a = '123abc' >> a.strip('21' )'3abc' >> >a.strip('12' )'3abc'
021-split()拆分字符串
1 2 3 4 5 6 7 8 9 10 11 12 13 14 15 16 17 18 19 20 21 22 23 24 25 26 27 28 29 30 31 32 33 34 35 36 37 38 39 40 41 42 43 44 45 46 47 48 49 50 51 52 53 54 55 56 函数:split () Python中有split ()和os.path.split ()两个函数,具体作用如下: split ():拆分字符串。通过指定分隔符对字符串进行切片,并返回分割后的字符串列表(list )os.path.split ():按照路径将文件名和路径分割开 一、函数说明 1 、split ()函数语法:str.split (str="" ,num=string .count (str))[n] 参数说明: str:表示为分隔符,默认为空格,但是不能为空('' )。若字符串中没有分隔符,则把整个字符串作为列表的一个元素 num:表示分割次数。如果存在参数num,则仅分隔成 num+1 个子字符串,并且每一个子字符串可以赋给新的变量 [n]:表示选取第n个分片 注意:当使用空格作为分隔符时,对于中间为空的项会自动忽略 2 、os.path.split ()函数语法:os.path.split ('PATH' ) 参数说明: 1 .PATH指一个文件的全路径作为参数:2 .如果给出的是一个目录和文件名,则输出路径和文件名3 .如果给出的是一个目录名,则输出路径和为空文件名二、分离字符串 string = "www.gziscas.com.cn" 1 .以'.' 为分隔符print (string .split ('.' ))['www' , 'gziscas' , 'com' , 'cn' ] 2 .分割两次print (string .split ('.' ,2 ))['www' , 'gziscas' , 'com.cn' ] 3 .分割两次,并取序列为1 的项print (string .split ('.' ,2 )[1 ])gziscas 4 .分割两次,并把分割后的三个部分保存到三个文件u1, u2, u3 =string .split ('.' ,2 ) print (u1)—— wwwprint (u2)—— gziscasprint (u3) ——com .cn 三、分离文件名和路径 import os print (os.path.split ('/dodo/soft/python/' ))('/dodo/soft/python' , '' ) print (os.path.split ('/dodo/soft/python' ))('/dodo/soft' , 'python' ) 四、实例 str="hello boy<[www.baidu.com]>byebye" print (str.split ("[" )[1 ].split ("]" )[0 ])www.baidu.com
021-replace()修改列表、元组、字典中的元素 1 2 3 4 5 6 7 8 9 10 11 12 13 14 15 16 17 18 19 20 21 22 23 24 25 26 27 描述 Python replace () 方法把字符串中的 old (旧字符串) 替换成 new (新字符串),如果指定第三个参数max ,则替换不超过 max 次。 语法 replace ()方法语法:str.replace(old , new [, max ]) 参数 old new max 返回值 返回字符串中的 old (旧字符串) 替换成 new (新字符串)后生成的新字符串,如果指定第三个参数max ,则替换不超过 max 次。 实例 以下实例展示了replace ()函数的使用方法: 实例 str = "this is string example....wow!!! this is really string" ;print str.replace("is" , "was" ); print str.replace("is" , "was" , 3 ); 以上实例输出结果如下: thwas was string example....wow!!! thwas was really string thwas was string example....wow!!! thwas is really string
022-join() 连接字符串数组 1 2 3 4 5 6 7 8 9 10 11 12 13 14 15 16 17 18 19 20 21 22 23 24 25 26 27 28 29 30 31 32 33 34 35 36 37 38 39 40 41 42 43 44 45 46 47 48 函数:string.join() Python中有join()和os.path.join()两个函数,具体作用如下: join(): 连接字符串数组。将字符串、元组、列表中的元素以指定的字符(分隔符)连接生成一个新的字符串 os.path.join(): 将多个路径组合后返回 一、函数说明 1 、join()函数语法: 'sep' .join(seq) 参数说明 sep:分隔符。可以为空 seq:要连接的元素序列、字符串、元组、字典 上面的语法即:以sep作为分隔符,将seq所有的元素合并成一个新的字符串 返回值:返回一个以分隔符sep连接各个元素后生成的字符串 2 、os.path.join()函数语法: os.path.join(path1[,path2[,......]]) 返回值:将多个路径组合后返回 注:第一个绝对路径之前的参数将被忽略 >> > seq1 = ['hello' ,'good' ,'boy' ,'doiido' ]>> > print ' ' .join(seq1)hello good boy doiido >> > print ':' .join(seq1)hello: good: boy: doiido >> > seq2 = "hello good boy doiido" >> > print ':' .join(seq2)h: e: l: l: o: :g :o :o :d : :b :o :y : :d :o :i :i :d :o >> > seq3 = ('hello' ,'good' ,'boy' ,'doiido' )>> > print ':' .join(seq3)hello: good: boy: doiido>> > seq4 = {'hello' : 1 ,'good' : 2 ,'boy' : 3 ,'doiido' : 4 }>> > print ':' .join(seq4)boy: good: doiido: hello >> > import os>> > os.path.join('/hello/' ,'good/boy/' ,'doiido' )'/hello/good/boy/doiido'
023-pyspark 023-汇总 1 2 3 4 5 6 7 8 9 10 11 12 13 14 15 16 17 18 19 20 21 22 23 24 25 26 27 28 29 30 31 32 33 34 35 36 37 38 39 40 41 42 43 44 45 46 47 48 49 50 51 52 53 54 55 56 57 58 59 60 61 62 63 64 65 66 67 68 69 70 71 72 73 74 75 76 77 78 79 80 81 82 83 84 85 86 87 88 89 90 91 92 93 94 95 96 97 98 99 100 101 102 103 github 搜python 搜python 工具 搜内周精选Githhb github.com/jackfrued python turtledeclare -A map=() Counter类 decode 是 python 打包exesshpass jstack etcd redis nginx nmon es kafka awk 对 某个字段分割处理 -vOFS python 多进程编程 博客园shut -n python 多进程(线程池)python 多线程分块读文件 python 爬虫01 -第一个小爬虫(博客园万有引力)书籍: Flask Web开发:基于Python的Web应用开发实战 Python Web开发学习实录 Python编程快速上手 让繁琐工作自动化 python 算法教程python redispython 捞取<span>多进程: 一、multiprocessing csdn 清尘 python 多线程/单线程 一休哥2018.3 .5 python2.7 GUI csdn luyaran 第一行和最后一行 awk ‘NR==1 ;END{print }’ lsof -i 123 (端口) 切换用户执行: su - xxx <<EOF xxxxx; exit; EOF shuf -n 随机数 打印时间点之间的每一分钟 sshpass awk多个分隔符 python 去除列表中的元素jstack awk substr()函数 awk判断大小 python redislist string data grip

