1
2
3
4
5
6
7
8
新港windows自动化测试虚机 10.242.11.232 mOQ:k03g 10.242.11.233 Y2hC0!xc233 后面给snbs使用,232 给uimg和oss使用用户名administrator
1
2
3
4
5
6
7
${url} Set Variable http://10.242.180.208:8787 Create Session kvreq ${url} ${resp} Put Request kvreq /region/pool/vol?pool=SNPOOL001&volume =nude052&size =107374182400 Should Be Equal As Strings ${resp.status_code} 400 curl -X PUT http://127.0.01:8787/region/pool/vol?pool=SNPOOL001&volume =nude052&size =102400000 并校验返回code
1
2
robotframework: https:// www.cnblogs.com/jinjiangongzuoshi/ category/792137.html
1
2
3
4
5
6
7
8
9
10
11
12
13
14
15
16
17
18
19
20
21
22
23
24
25
26
27
28
29
30
31
32
33
34
35
36
37
38
39
40
41
42
43
44
45
46
47
4.保存工程 快捷键:ctrl+shift +s(保存整个工程),ctrl+s(局部保存,只保存鼠标点击的部分) 二、快捷键: 重命名——》F2 搜索关键字——》F5 执行用例——》F8 创建新工程——》ctrl+n 创建新测试套——》ctrl+shift +f 创建新用例——》ctrl+shift +t 创建新关键字——》ctrl+shift +k 向上移动用例——》ctrl+↑ 向下移动用例——》ctrl+↓ 显示关键字信息——》 ctrl+鼠标悬浮(鼠标悬浮于关键字上) 自动补全关键字——》ctrl+shift +空格 删除行——》ctrl+d 删除单元格——》ctrl+shift +d 插入单元格——》ctrl+shift +i 插入行——》ctrl+i 屏蔽代码——》ctrl+ 取消屏蔽——》ctrl+$ 保存整个工程——》ctrl+shit+s 局部保存,保存鼠标点击的部分——》ctrl+s 查看log ——》ctrl+L 查看report——》ctrl+r 注意:如果快捷键不能使用,先看看是否有其他软件已占用相应的快捷键
1
2
3
4
全局列表: 在全变量下面选择"new list varible" 如何读取列表中的某一个值:${Master_ip[1]}
1
2
3
4
for 循环:: FOR ${table -name } IN @{table -list1} create -table -1 ${cluster -ip} ${cluster -name } ${db-name } ${table -name } log outside loop
1
2
3
pip install robotframework-SSHLibrary --proxy http:// xzproxy.cnsuning.com:8080 -i https:// pypi.tuna.tsinghua.edu.cn/simple/ pip install jsonpatch --proxy http:// xzproxy.cnsuning.com:8080 -i https:// pypi.tuna.tsinghua.edu.cn/simple/ pip install robotframework-httplibrary --proxy http:// xzproxy.cnsuning.com:8080 -i https:// pypi.tuna.tsinghua.edu.cn/simple/
1
2
3
4
5
6
7
8
9
10
11
12
13
14
15
16
17
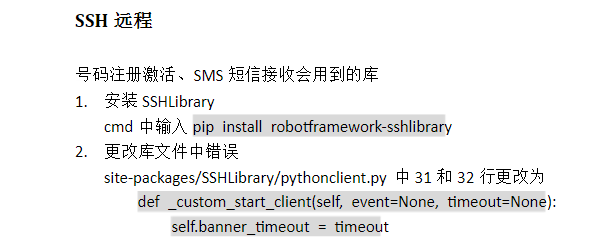
SSH 远程(可以不更改) 号码注册激活、SMS 短信接收会用到的库 1. 安装 SSHLibrary cmd 中输入 pip install robotframework-sshlibrary 2. 更改库文件中错误 site-packages/SSHLibrary/pythonclient.py 中 31 和 32 行更改为 def _custom_start_client(self , event =None , timeout =None ): self.banner_timeout = timeout https://www.tceic.com/4 gg5268168ji5022ggkg998lii22hij126ll42i1.html 解决:ssh问题 https://blog.csdn.net/Lsaisai/article/details/81510775 安装ecdsa pip install ecdsa 安装paramiko pip install paramiko==1.17 .1 注意版本号 安装robotframework-sshlibrary pip install robotframework-sshlibrary==2.1 .1 http ://blog.sina.com.cn/s/blog_71bc9d680102xa2q.html
1
2
3
4
5
6
7
8
9
10
11
12
13
14
15
16
17
18
19
20
21
22
23
24
25
26
27
28
29
30
31
32
33
34
35
36
37
38
39
40
41
Robot Framework中SSHLibrary 学习与总结: https: //www.cnblogs.com/mianbaoshu /p/ 8857765 .htmlhttps: //blog.csdn.net/silencemylove /article/details /48653615 https:/ /www.cnblogs.com/senjougahara /p/ 6090000 .html官方包下载地址: https: //pypi.org/project /paramiko/ pip源: http: //mirrors.aliyun.com/pypi /simple/ 清华:https: //pypi.tuna.tsinghua.edu.cn/simple 阿里云:http: //mirrors.aliyun.com/pypi /simple/ 中国科技大学 https: //pypi.mirrors.ustc.edu.cn/simple / 华中理工大学:http:/ /pypi.hustunique.com/ 山东理工大学:http: //pypi.sdutlinux.org/ 豆瓣:http: //pypi.douban.com/simple / https:/ /blog.csdn.net/ Lsaisai/article/details/81510775 6 . 总结有 .whl 或 .egg 的, 就不要使用 .tgz, cffi 就很难在离线状态下从源码编译成功. http: //xzproxy.cnsuning.com:8080为代理 python -m pip install --upgrade pip --proxy http:/ /xzproxy.cnsuning.com:8080 -i https:/ /pypi.tuna.tsinghua.edu.cn/simple / pip install robotframework-SSHLibrary --proxy http:/ /xzproxy.cnsuning.com:8080 -i https:/ /pypi.tuna.tsinghua.edu.cn/simple / pip install robotframework-SSHLibrary --proxy http:/ /xzproxy.cnsuning.com:8080 -i http:/ /mirrors.aliyun.com/pypi /simple/ pip install robotframework-SSHLibrary==2.1 .1 --proxy http: //xzproxy.cnsuning.com:8080 -i http:/ /mirrors.aliyun.com/pypi /simple/ pip install robotframework-sshlibrary==2.1 .1 --proxy http: //xzproxy.cnsuning.com:8080 python -m pip install --upgrade pip --proxy http:/ /xzproxy.cnsuning.com:8080 -i https:/ /pypi.tuna.tsinghua.edu.cn/simple / pip install robotframework --proxy http:/ /xzproxy.cnsuning.com:8080 -i https:/ /pypi.tuna.tsinghua.edu.cn/simple / pip install robotframework-ride --proxy http:/ /xzproxy.cnsuning.com:8080 -i https:/ /pypi.tuna.tsinghua.edu.cn/simple / pip install robotframework-httplibrary --proxy http:/ /xzproxy.cnsuning.com:8080 -i https:/ /pypi.tuna.tsinghua.edu.cn/simple /
1
2
3
4
5
6
7
8
9
10
11
12
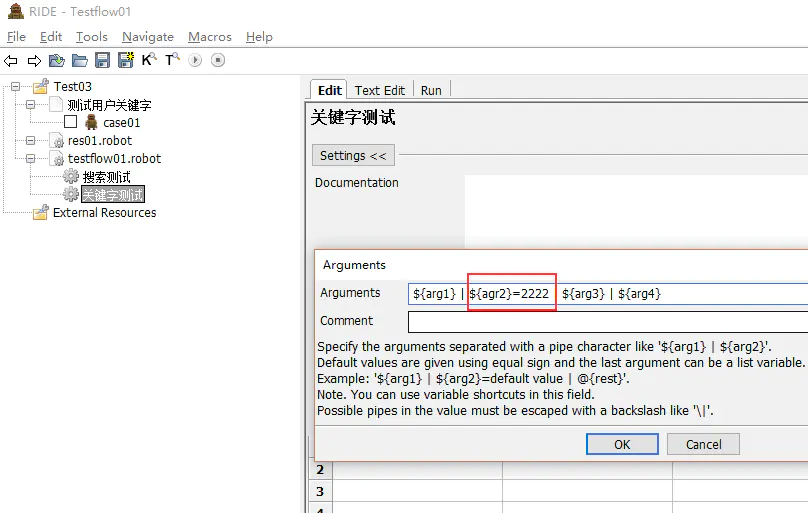
robotframework默认值:https: 假设我们想把其中第2 个参数设成选填参数,选填参数就是给参数加上默认值。 默认值使用 = 加上值,如果想默认为空,只写等号就行了。 (默认值的意思不需要细讲了哈,就是如果你在调用这个关键字的时候,如果不给这个选填参数传值,那么就使用默认值作为参数的值) 如果我们直接这样加的话,点击OK就会报错。意思是说必填参数不允许在选填参数后面。 也就是说如果某一个参数设置成了选填参数,那么他后面的参数都必须是选填参数,不能是必填参数。 在我们这里就是第2 个参数如果要可选,要么把3 、4 参数也都设置上默认值,要么就把第2 个参数调整到最后去。我先调整成下面这样,就不会报错了
1 2 3 4 5 6 7 8 9 10 11 12 13 14 15 16 https://www.cnblogs.com/jasmine0112/p/12191140. html robotframework常见报错记录 1. 'Response' object has no attribute '__getitem__' :'Response' 对象没有属性' getitem__' response对象的属性 r.status_code HTTP请求的返回状态 r.text HTTP响应内容的字符串形式,即:url对应的页面内容 r.encoding 从HTTP header 中猜测的响应内容编码方式 r.apparent_encoding 从内容中分析出的响应内容编码方式(备选编码方式) r.content HTTP响应内容的二进制形式 简单来说就是不能直接使用response对象,而是需要使用response对象的属性,经常使用的属性有r.content和r.text 2. Keyword 'BuiltIn.Should Be Equal As Strings' expected 2 to 5 arguments, got 0. 检查条件语句的大小写和使用是否正确
怎么样导入RobotFramework 自定义关键字(库文件) 1 2 3 4 5 6 7 8 9 10 11 12 13 14 15 16 17 18 19 20 21 22 23 https: //my.oschina.net/hibony /blog/ 665001 ?p={{pagemytool.py class mytool (): def __init__ (self ) : pass def test_a_b (self ,a,b) : '' ' 比较两个参数的大小 ' '' if a>b: flag = False return flag else: flag = True return flag __init__ .py from mytool import mytool version = '1.0' class MyLibrary (mytool ): ROBOT_LIBRARY_SCOPE = 'GLOBAL'
1 2 3 4 5 6 7 8 在编辑工具中添加插件 在编辑工具中添加插件,支持RF的格式高亮等 1 、notepad++https: 2 、其他IDE参考https:
RobotFramework: 获取当前时间戳 DateTime 库
1 2 3 4 5 6 #获取当前时间:2019 -07 -31 10 :46 :29.940 ${time} Get Current Date result_format=timestamp #转化为原始时间戳:1564541189.94 ${time_stamp} Convert Date ${time} epoch #转化为毫秒级时间戳:1564541189940 ${time_stamp2} evaluate int (round(${time_stamp} * 1000 ))
Python2.X如何将Unicode中文字符串转换成 string字符串 https://www.cnblogs.com/xiaojikuaipao/p/9584386.html
1 2 3 4 5 6 7 8 9 10 11 12 13 普通字符串可以用多种方式编码成Unicode字符串,具体要看你究竟选择了哪种编码: unicodestring = u"Hello world" utf8string = unicodestring.encode("utf-8" ) asciistring = unicodestring.encode("ascii" ) isostring = unicodestring.encode("ISO-8859-1" ) utf16string = unicodestring.encode("utf-16" ) plainstring1 = unicode(utf8string, "utf-8" ) plainstring2 = unicode(asciistring, "ascii" ) plainstring3 = unicode(isostring, "ISO-8859-1" ) plainstring4 = unicode(utf16string, "utf-16" ) assert plainstring1 == plainstring2 == plainstring3 == plainstring4
自定库使用断言来判断是否异常 https://www.jianshu.com/p/eea0b0e432da
https://www.jianshu.com/p/b70b3340e55f
1 2 3 4 5 def compare (a, b) : assert a>b, 'error: b is bigger' print('compare: %d %d' %(a, b)) compare(1 , 3 )
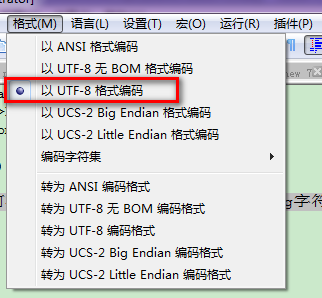
自定库备注展示 0xb2 不展示中文 1 建notepate++ 编码改成 UTF-8 格式编码
关键字run keyword if 使用总结包括【Evaluate神奇用法】 1 2 https:// blog.csdn.net/haiweizhourong/ article/details/ 81905016 robot framework ——关键字run keyword if 使用总结包括
1、if后要执行多关键字方法用 Run Keywords AND ,或者封装一个关键字的组合
2、if 后面的条件是多条件的用and,见下图
3、run keyword if ELSE 注意这个ELSE 不能用小写,robotframwork 的关键字不区分大小写,但是这个ELSE例外
4、常用的比较符合见下图,供参考
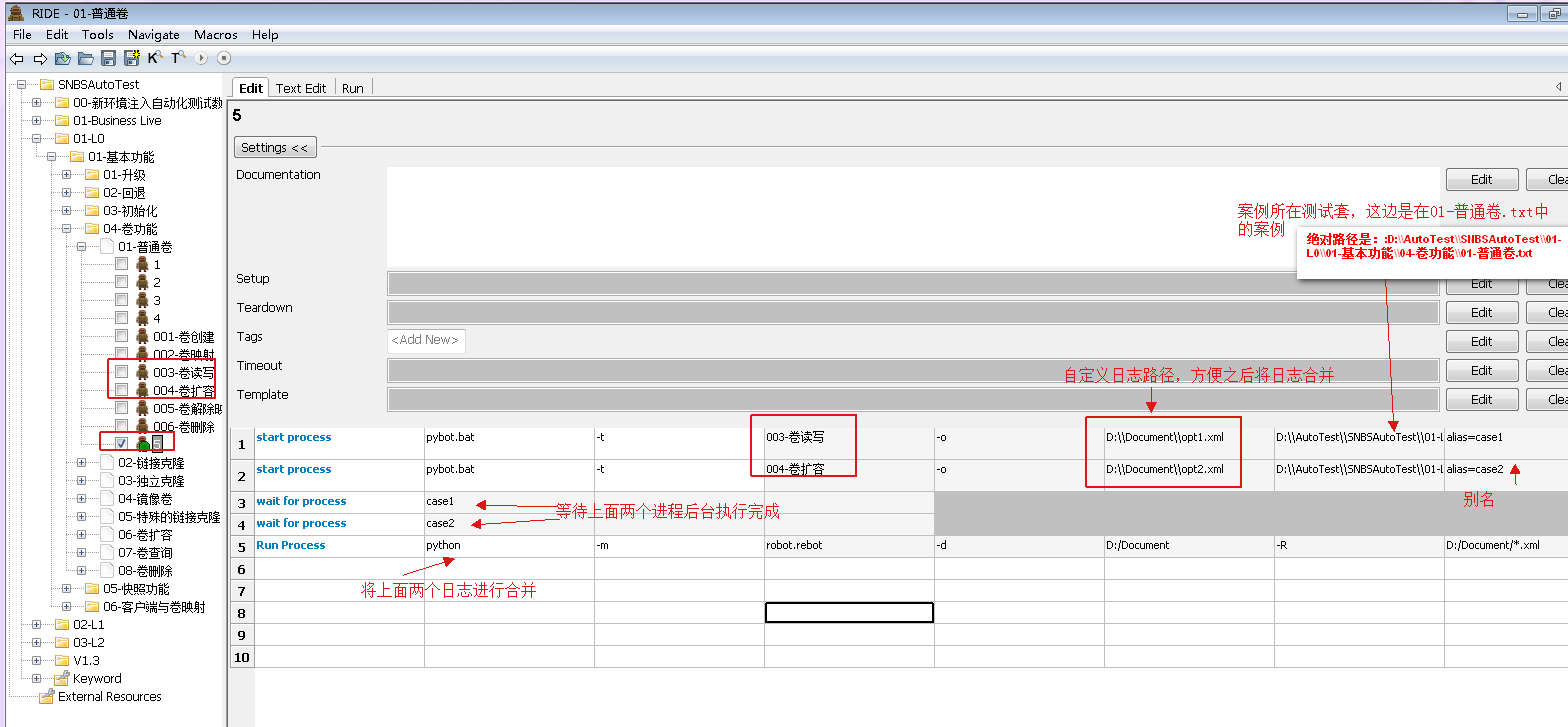
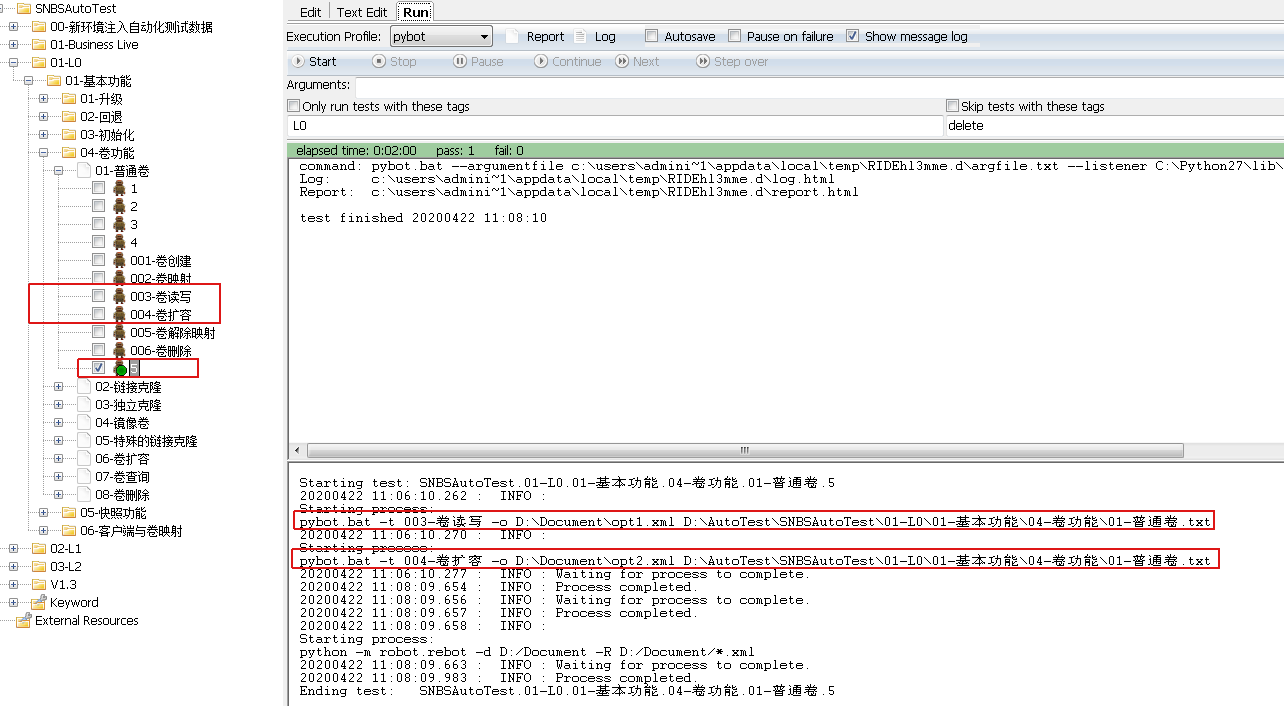
robotframework 多进程 多线程 1 2 3 4 5 6 7 8 9 10 11 12 13 14 15 16 17 18 19 20 21 22 23 24 自己使用总结: Run Process pybot.bat -t 003 -o D:\\ Document\\ opt1.xml D:\\ AutoTest\\ SNBSAutoTest\\ 01-L0\\ 01-基本功能\\ 04-卷功能\\ 01-普通卷.txt 注意点: Start Process 代表后台执行,不用等待进程执行完成 Run Process 执行线程,需要等待进程执行完成 start process pybot.bat -t 案例名称 -o 日志输出到哪里 测试套名称文件 alias=case1 Run Process pybot.bat -t 案例名称 -o 日志输出到哪里 测试套名称文件 wait for process case1#配合后台start process执行 具体例子: start process pybot.bat -t 003-卷读写 -o D:\\ Document\\ opt1.xml D:\\ AutoTest\\ SNBSAutoTest\\ 01-L0\\ 01-基本功能\\ 04-卷功能\\ 01-普通卷.txt alias=case1 start process pybot.bat -t 004-卷扩容 -o D:\\ Document\\ opt2.xml D:\\ AutoTest\\ SNBSAutoTest\\ 01-L0\\ 01-基本功能\\ 04-卷功能\\ 01-普通卷.txt alias=case2 wait for process case1 wait for process case2 Run Process python -m robot.rebot -d D:/Document -R D:/Document/*.xml 备注: 003-卷读写、004-卷扩容 #案例名称 D:\\ Document\\ opt1.xml D:\\ Document\\ opt2.xml #日志路径 D:\\ AutoTest\\ SNBSAutoTest\\ 01-L0\\ 01-基本功能\\ 04-卷功能\\ 01-普通卷.txt #测试套,案例所在文本文件 alias=case1 alias=case2 #别名 python -m robot.rebot -d D:/Document -R D:/Document/*.xml #将案例日志合并输出
1 2 3 4 5 6 7 8 9 10 11 https: robotframework 多进程 多线程 参考答案: 使用Process Library 多进程,后台执行 https: http: RF 合并测试结果的工具 Rebot: https: 下面给出使用Process 的例子: 导入Process 库下
使用多进程执行:
分析:
发散思维:
1 2 3 4 Start Process pybot -s suite1 -o xx/output1.xml D :/xxx/projectStart Process pybot -s suite2 -o xx/output2.xml D :/xxx/projectStart Process pybot -s suite3 -o xx/output3.xml D :/xxx/projectStart Process pybot -s suite4 -o xx/output4.xml D :/xxx/project1234
这里就相当于后台执行project 的4个测试套件,然后我们会得到四个output?.xml 输出文件
python -m robot.rebot outputs/*.xml -r report/merge_report.html
最后得到的merge_report.html 就是我们合并后的最终测试报告
再看看我们的case:
1 start process pybot.bat -t exec_script -o D:/Document /outputs/opt1.xml D:/Document /GitProject/auto -unix/unix.txt alias =case1 start process pybot.bat -t test_remote -o D:/Document /outputs/opt2.xml D:/Document /GitProject/auto -unix/unix.txt alias =case2 wait for process case1 wait for process case2 Run Process python -m robot.rebot -d D:/Document /outputs -R D:/Document /outputs
后跑一下,看看我们的结果:
数字计算 1 2 3 4 https: 转换参数为浮点数。 如果可选参数precision 是正数或零,返回的四舍五入的值。负数则相当于修改-precision 位数为0 如果可选参数precision 是负数,返回的四舍五入的值。
例子:
${result} =
Convert To Number
42.512
# Result is 42.512
${result} =
Convert To Number
42.512
1
# Result is 42.5
${result} =
Convert To Number
42.512
0
# Result is 43.0
${result} =
Convert To Number
42.512
-1
# Result is 40.0
注意机器一般不能准确地存储浮点数。参见http://docs.python.org/tutorial/floatingpoint.html 。
1 2 3 4 5 6 转换参数为八进制字符串。 如果添加了base参数,则先内部使用Convert To Integer 转换为整数,然后再转换为八进制数字,以字符串的形式显示,比如'775' '。 返回值可以包含可选的前缀和最小长度(不包含前缀和负号等)。如果返回值比要求的长度短,则使用0填充。 默认返回大写字符串,lowercase参数会转换值为小写(不包含前缀)。 例子:
${result} =
Convert To Octal
10
# Result is 12
${result} =
Convert To Octal
-F
base=16
prefix=0
# Result is -017
${result} =
Convert To Octal
16
prefix=oct
length=4
# Result is oct0020
技巧整数构造浮点数:
使用robotframework做接口测试之一——准备工作 1 2 3 4 5 6 7 8 9 10 11 12 13 14 15 最近发现做接口测试的朋友越来越多了,打算写一个系列的rf+requests做接口测试(主要是Http接口)的文档,可以帮助新入门的同学对接口测试有个大概的了解,同时也是敦促自己做总结的一种手段。希望经验丰富的大神路过时,如发现我文档中的不足,提出中肯的批评及更好的解决思路。以期共同进步。 一、环境准备 1 )默认已经安装robotframework2 )默认已经安装requests库3 )默认已经安装并成功导入RequestsLibrary4 )会用抓包工具,fiddler或Charles都可用这个库做接口测试,希望用户本身对这个库有一定的了解,如果不了解,那么我们来叨一叨选择的理由。 1 )Python的requests库号称是“HTTP for Humans”,它提供了非常方便且人性化的接口调用方法,上手快,功能强大且完美,甩同类库urllib2, httplib好几条街。国外网友的使用心得大多是,呵呵呵呵,用requests库十几行代码,把以前的几百行代码重构了。缺点是封装了太多层,不利于http底层原理的理解。中文版用户指南:http:2 )RequestsLibrary是基于requests模块做的RF库,其根基本身就强大,再加上git上有一些大神一直在对其进行持续地更新及维护,提供了很不错的官方Demo,从使用人数来说,也是完爆那些HTTPLibrary之流,意味着遇到问题得到解答的机会更大。Git地址:https: 二、Http接口测试初窥 这一节要写一个get 请求的例子,强烈推荐使用官方Demo入门,并且建议新老用户都熟悉Demo的每一个细节,对,是每一个细节。笔者当初多走了许多弯路,对这个细致的Demo相见恨晚,每次都温习demo而后知耻。。 第一个栗子:假如有个这样的get 请求:https:
1 2 3 4 5 6 7 8 可以看出,这个接口请求中: 协议: https 访问的host: api.github.com root url(基础url): https: 相对uri: /users/bulkan method : get 传输参数: 无 该抓包其对应的测试用例如下:
1 2 3 4 5 6 7 8 9 10 11 对应到用例,第一步创建一个到https://api.github.com的session ,取个很容易认的别名github,第二步,使用get 方法,访问别名为github的相对路径/users/bulkan。第3 ,4 步断言返回数据。 对于前面两步,直接使用requests.get 方法可以一步完成,为什么要强制拆成两步呢。可以大概揣测一下作者的意图: 1 、使用别名,会使后面的请求写起来更顺手,用例也比较好看,大部分时候访问同一地址的请求,不需要重复创建session 2 、session 的使用,可以实现跨请求保持一些cookie,这个功能才是session 的重头戏。Get request的好基友是post request,也是非常基础的必须掌握的一种请求方式,这个我就不写了。官方Demo几乎列出了所有可能出现的get 及post请求的例子,非常经典,实际项目中都能从里面找到原型。另外还有一些不常见的请求方式如head, put, delete 等,也有例子。三、如何开始你的接口测试第一步 首先,你得有项目组完善且规范的接口文档。好吧,大部分的中小公司的宝宝会说啥文档也没有。也可以通过抓包来开始做项目的接口demo,在无须外力的因素下迈出第一步,但是单凭抓包是抓不全的,所以最终实施前还是得搞来一份完整的接口文档,才能保证用例的覆盖。 单有接口文档也是不够的,还要学会如何抓包,抓包后知道如何解剖一个请求,重点关注请求的method , url, request header , request body, cookie, response header , response body等,还是那句话,办法永远比问题多,培养好的观察能力和解决问题能力无比重要。
举例:
1 2 3 4 5 6 7 ${url} Set Variable http://10.242.180.208:8787 Create Session kvreq ${url} ${resp} Put Request kvreq /region/pool/vol?pool=SNPOOL001&volume =nude052&size =107374182400 Should Be Equal As Strings ${resp.status_code} 400 curl -X PUT http://127.0.01:8787/region/pool/vol?pool=SNPOOL001&volume =nude052&size =102400000 并校验返回code
1 2 3 4 全局列表: 在全变量下面选择"new list varible" 如何读取列表中的某一个值:${Master_ip[1]}
1 2 3 4 for 循环:: FOR ${table -name } IN @{table -list1} create -table -1 ${cluster -ip} ${cluster -name } ${db-name } ${table -name } log outside loop
1 2 3 pip install robotframework-SSHLibrary --proxy http:// xzproxy.cnsuning.com:8080 -i https:// pypi.tuna.tsinghua.edu.cn/simple/ pip install jsonpatch --proxy http:// xzproxy.cnsuning.com:8080 -i https:// pypi.tuna.tsinghua.edu.cn/simple/ pip install robotframework-httplibrary --proxy http:// xzproxy.cnsuning.com:8080 -i https:// pypi.tuna.tsinghua.edu.cn/simple/
ssh远程:
1 2 3 4 5 6 7 8 9 10 11 12 13 14 SSH 远程(可以不更改) 号码注册激活、SMS 短信接收会用到的库 1. 安装 SSHLibrary cmd 中输入 pip install robotframework-sshlibrary 2. 更改库文件中错误 site-packages/SSHLibrary/pythonclient.py 中 31 和 32 行更改为 def _custom_start_client(self , event =None , timeout =None ): self.banner_timeout = timeout https://www.tceic.com/4 gg5268168ji5022ggkg998lii22hij126ll42i1.html 解决:ssh问题 https://blog.csdn.net/Lsaisai/article/details/81510775 安装ecdsa pip install ecdsa 安装paramiko pip install paramiko==1.17 .1 注意版本号 安装robotframework-sshlibrary pip install robotframework-sshlibrary==2.1 .1
Robot Framework中SSHLibrary 学习与总结:
1 2 3 4 5 6 7 8 9 10 11 12 13 14 15 16 17 18 19 20 21 22 23 24 25 26 27 28 29 30 31 32 33 34 35 36 37 38 39 40 41 Robot Framework中SSHLibrary 学习与总结: https: //www.cnblogs.com/mianbaoshu /p/ 8857765 .htmlhttps: //blog.csdn.net/silencemylove /article/details /48653615 https:/ /www.cnblogs.com/senjougahara /p/ 6090000 .html官方包下载地址: https: //pypi.org/project /paramiko/ pip源: http: //mirrors.aliyun.com/pypi /simple/ 清华:https: //pypi.tuna.tsinghua.edu.cn/simple 阿里云:http: //mirrors.aliyun.com/pypi /simple/ 中国科技大学 https: //pypi.mirrors.ustc.edu.cn/simple / 华中理工大学:http:/ /pypi.hustunique.com/ 山东理工大学:http: //pypi.sdutlinux.org/ 豆瓣:http: //pypi.douban.com/simple / https:/ /blog.csdn.net/ Lsaisai/article/details/81510775 6 . 总结有 .whl 或 .egg 的, 就不要使用 .tgz, cffi 就很难在离线状态下从源码编译成功. http: //xzproxy.cnsuning.com:8080为代理 python -m pip install --upgrade pip --proxy http:/ /xzproxy.cnsuning.com:8080 -i https:/ /pypi.tuna.tsinghua.edu.cn/simple / pip install robotframework-SSHLibrary --proxy http:/ /xzproxy.cnsuning.com:8080 -i https:/ /pypi.tuna.tsinghua.edu.cn/simple / pip install robotframework-SSHLibrary --proxy http:/ /xzproxy.cnsuning.com:8080 -i http:/ /mirrors.aliyun.com/pypi /simple/ pip install robotframework-SSHLibrary==2.1 .1 --proxy http: //xzproxy.cnsuning.com:8080 -i http:/ /mirrors.aliyun.com/pypi /simple/ pip install robotframework-sshlibrary==2.1 .1 --proxy http: //xzproxy.cnsuning.com:8080 python -m pip install --upgrade pip --proxy http:/ /xzproxy.cnsuning.com:8080 -i https:/ /pypi.tuna.tsinghua.edu.cn/simple / pip install robotframework --proxy http:/ /xzproxy.cnsuning.com:8080 -i https:/ /pypi.tuna.tsinghua.edu.cn/simple / pip install robotframework-ride --proxy http:/ /xzproxy.cnsuning.com:8080 -i https:/ /pypi.tuna.tsinghua.edu.cn/simple / pip install robotframework-httplibrary --proxy http:/ /xzproxy.cnsuning.com:8080 -i https:/ /pypi.tuna.tsinghua.edu.cn/simple /


